How to connect a heating radiator: one-pipe and two-pipe
Those who decided to design and implement a device for heating a home personally will have to work through all the details of the process. And if for specialists with experience of such works everything seems simple, then beginners will have many questions, for example, what materials and equipment to use. We will talk about how to properly connect the heater - the battery.

General information about heating systems
It is important to initially decide how to connect the radiators to each other. In the language of specialists, it is necessary to decide which of the ways of strapping heating devices to use.
For all types of heating systems, there are two ways of laying pipelines:
- Single pipe;
- Two-pipe
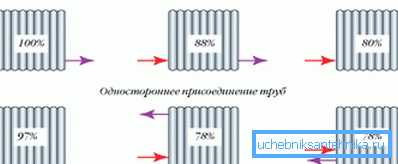
One pipe design
Systems in which the transportation of hot water as a coolant is carried out on the same line are less efficient for the following reasons:
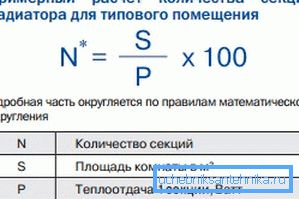
- Practically do not allow to regulate the heating of a separate device;
- As the distance from the source of heat carrier increases, its temperature gradually drops and the last radiator in the circuit may turn out to be barely warm, or even completely cold;
- In case of emergency on any part of the network, it is necessary to completely turn off the heating.
Note! The only advantage of this type of wiring heating pipes compared to the two-pipe - its low price.
Such one-pipe heating systems are mainly used in high-rise buildings with centralized heat supply to consumers.
Two-pipe scheme
In the private sector, to create autonomous (looped on one consumer) heating systems most often use a two-pipe radiator piping scheme:
- One of the pipes supplying the coolant to the device;
- The other is for the return movement to the heat source heating medium (boiler).
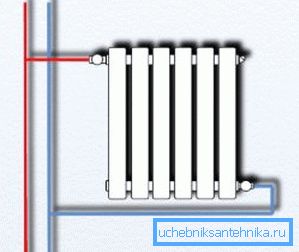
All batteries in the system are connected in parallel, so that the two lines are completely separate and are connected only on the end radiator.
The two-pipe radiator connection scheme has the following advantages:
- The ability to control the heating of each device in the circuit, which ensures the creation of the most comfortable conditions in different rooms;
- Regardless of the distance between the boiler and the battery, each of the devices heats up equally;
- If repair or replacement is necessary on any part of the system, its complete shutdown is not required.
Now we will talk about how to properly connect a heating radiator with your own hands.
Types of connecting pipes to batteries
But first, consider how best to connect a heating radiator to the supply and return pipes.
There are three types of radiator piping:
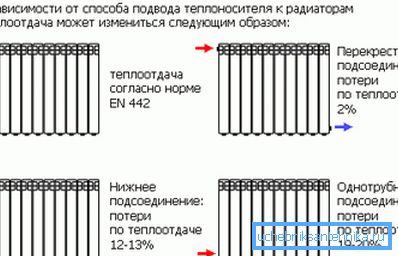
- Lateral. With this method, pipelines are connected on one side of the radiator:
- The feed at the top of the device;
- Reverse at the bottom.
Note! Side connection is the most common and effective type of connection of radiators and main pipes. However, its efficiency is reduced when connected to a network of devices with a large number of sections.
- Diagonal. This type of strapping is most suitable for connecting very wide batteries (with a large number of sections). This method involves eyeliner:
- The supply pipe at the top of the radiator, on the one hand;
- Return pipeline at the lowest point on the other side of the device;
Note! Diagonal connection ensures uniform distribution of the coolant throughout the device. With an inverted diagonal connection (flow from below, return from top), the efficiency of the heating system will decrease by 10%.
- Bottom. This method of connecting radiators to the heating main is less efficient (10% lower than with side trim). Therefore, it is resorted to only for underground (hidden) wiring of heating pipelines.
Placement of heating devices
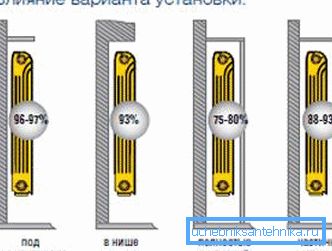
It is of great importance not only how to connect the radiators to each other, but also their correct location in relation to building structures. Traditionally, radiators are installed along the walls of the premises and locally under the windows in order to reduce the penetration of cold air in the most vulnerable place.
There is a clear instruction on this in the SNiP on the installation of thermal equipment:
- The gap between the floor and the bottom of the battery should not be less than 120 mm. If the distance from the device to the floor decreases, the heat flux distribution will be uneven;
- The distance from the back surface to the wall, on which the radiator is mounted, must be from 30 to 50 mm, otherwise its heat transfer will be disturbed;
- The gap from the top edge of the heater to the window sill is maintained in the range of 100-120 mm (not less). Otherwise, it may be difficult to move thermal masses, which will weaken the heating of the room.
Bimetallic heating devices
To understand how to interconnect bimetallic radiators, you need to know that they almost all fit any kind of connection:
- They have four points of possible connection - two upper and two lower ones;
- Equipped with plugs and a Mayevsky crane, through which it is possible to release the air gathered in the heating system;
A diagonal connection is considered the most effective for bimetallic batteries, especially when it comes to a large number of sections in the device. Although very wide batteries, equipped with ten or more sections are undesirable to use.
Tip! It is better to ponder the question of how to properly connect two 7-8 section heating radiators instead of a single appliance of 14 or 16 sections. It will be much easier to install and easier to clean.
Another question - how to connect sections of a bimetallic radiator can occur when rearranging sections of the heater in different situations:
- In the process of creating new heating networks;
- If necessary, replace a failed radiator with a new - bimetallic;
- In case of underheating, you can increase the battery by attaching additional sections.
Aluminum batteries
Interesting! By and large, it should be noted that diagonal connection is an excellent option for any type of battery. You do not know how to connect aluminum radiators to each other, connect diagonally, you will not lose!
For closed-type heating networks in private homes it is advisable to install aluminum batteries, since here it is easier to ensure proper water treatment before filling the system. And their cost is much lower than that of bimetallic devices.
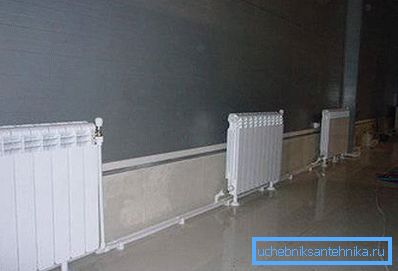
Of course, you have to try, before you connect the sections of the aluminum radiator to regroup.
Tip! Do not rush to remove the factory packaging (film) from the installed heaters until the end of the finishing work in the room. This will shield the radiator cover from damage and contamination.
Conclusion
The workflow itself does not take much time, you do not need any special skill or expensive equipment, you can purchase all the necessary tools in any hardware store. And do not forget, the connection will serve you for a long time and without hassle only if you used high-quality materials in your work and followed all the rules for installing a heating system.

In the presented video in this article you will find additional information on this topic.