The distance from the radiator to the wall: mounting,
Installing batteries is an important process affecting the performance of the entire heating system of a private house or apartment. It is necessary to pay attention not only to the quality of sanitary connections, but also to the observance of air gaps to the window sill, floor and walls. More on this in our article.

Radiator mount
The modern market of heating systems offers customers a large selection of different materials and options for the performance of radiators.
By fastening methods, they are divided into the following groups:
- Outdoor - equipped with small legs, installed directly on the floor of the premises. This option allows you to ensure the required thermal gap to the windowsill and the lower horizontal surfaces of rooms.
- Hinged - mounted directly on metal brackets fixed in the outer walls of a house or apartment.
The required distance from the wall to the heating radiator is best provided by the products fastened to the vertical surfaces of the room, which is ensured by a special form of brackets. For outdoor species, this parameter must be adjusted independently.
Influence of the gap between the wall and the radiator
Many novice home craftsmen do not understand the importance of the need to adjust the required gap between the batteries and the outer walls. This ultimately leads to a significant increase in unreasonable expenses for heating a house. Let us dwell on the problem in more detail.
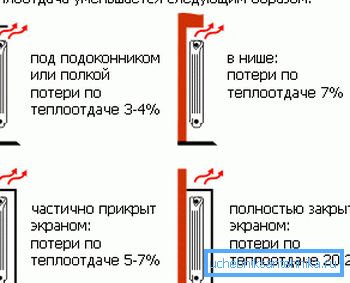
The outer wall is in constant contact with the surrounding air, which leads to its significant cooling. In the event that the heating batteries are fixed directly on the inner surface of the supporting structures, the main part of the heat will not be spent on heating the air in the interior of the house, but on heating the wall material.

Low thermal insulation properties of concrete products will not allow to maintain an acceptable internal microclimate. Up to 70% of thermal energy in the case when the distance between the wall and the radiator is minimally spent on heating the atmosphere. Therefore, moving the heater away for a short distance, create the necessary air insulation, reducing unnecessary waste.
How to determine the required distance
Many construction works carried out inside the premises are governed by building codes and regulations (SNiP). There is a SNiP and installation of radiators.
From it you can not only find out what distance between the wall and the radiator is necessary to observe, but also other parameters of its installation:
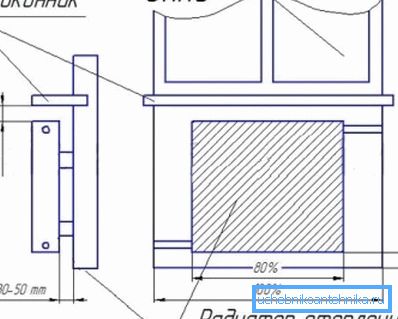
- the device should be placed directly under the windows so that the centers of the opening and the batteries coincide;
- the width of the heater should not exceed 70% of the width of the subwindow niche, if any;
- the distance to the floor should not exceed 12 cm, to the window sill - 5 cm;
- the distance to the wall lies within 2-5 cm.

There are several parameters that affect the choice of the optimal gap. Most often it is influenced by the material of the walls of the house and the size of the window sills. In some rooms, you can see an ugly picture, when the batteries significantly protrude beyond its limits.
Note! Significant reduction of the gap between the wall and appliances of heating systems contributes to the additional surface treatment of vertical structures with special heat-reflecting materials, the price of which is affordable. These include foiled insulation or screens of aluminum foil.

Installation of a radiator
The main way to adjust the required distance to the walls is high-quality and competent installation of heating devices with your own hands or with the help of specialists. Let us dwell on this aspect in more detail.
Installation of floor views
This mounting option is optimal for products with high mass and made most often of cast iron. Such batteries are equipped with removable or stationary legs, which are fixed to the floor. Depending on the material of the base, fastening can be done with wood screws, screws and plastic dowels, nail dowels.

A necessary element of the installation of the floor heating device is a wall bracket. It is set to the required height, which is defined as the desired distance from the floor to the upper longitudinal pipe of the radiator, taking into account the gap. With the help of fasteners and marking of their installation sites achieve the optimal distance to the floor, wall and window sill.
We hang wall radiator
Each heater is equipped with one or another type of suspensions used for installation on walls. The material and strength characteristics of the brackets should correspond to the mass of the heating battery, taking into account the filling with its heat carrier. Otherwise, system leakage is possible.

Before direct installation it is necessary to determine the place of installation and the required distances to the main surfaces.
To do this, follow these steps:
- Determine the center of the window and apply the markup on the wall to be combined later with the center of the radiator.
- Measure the distance from the bottom edge of the batteries to the top tube and add 12 cm. This size is set aside from the floor at the mounting points of the brackets, checking the horizontal position of the fixing points.
- In the places where the suspensions are installed, we drill the holes with a hole drill, install dowels in them and fix the brackets with self-tapping screws.
Note! A similar instruction is attached to each package sold radiators. Differences may lie in the specific type of suspensions and features of their installation.

Summing up
In this article, we looked at how far from the wall to hang a radiator, what it affects and how it is carried out directly when installing the heating system. More information on this topic - in the video in this article.