Underfloor heating: how to ensure effective heating of the
Underfloor heating today can be used as part of a common heating system, and as a universal design that ensures the maintenance of the indoor climate. However, in any case, it should be mounted according to certain standards, and this article will be devoted to this issue.

Efficiency mark
In most cases, when designing a heating system, heating elements (radiators, convectors or radiators) are located on the walls of the room. This often leads to an overspending of energy carriers: it is necessary to “sink” with an excess, otherwise the bare feet on the floor feel a strong discomfort.
Note! And if you remember that hypothermia of the lower limbs of the part leads to the development of colds, the desire to “keep your feet warm” becomes quite understandable.
In order to avoid such a development, quite often the owners of the premises decide to place heating cables or heating pipes on the floor. This decision will be very rational:
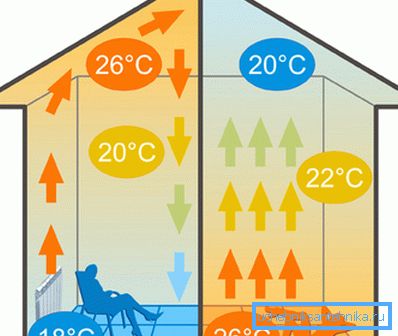
- Even if the installation of radiators and heating convectors on the walls is refused when installing a heated floor, energy costs will be significantly reduced. due to the optimal distribution of heat flow.
- If you use floor heating as an additional source of comfort, then energy savings will not be as noticeable, but we will achieve some reduction in costs..
So, in any case, it is worth doing this project. And although the price of materials will be considerable, the costs will pay off pretty quickly.
Mounting technique
Water system
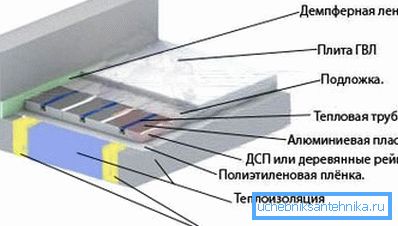
Arranging heating on the floor, we can use two design schemes - water and electric. Each of them has a huge amount of nuances, and before you start the installation with your own hands, you should thoroughly examine them. Here we present only the most general operation algorithm.
Let's start with the water system:
- We use a boiler or an autonomous boiler as a heat source. Connecting to the system of general heating or hot water is not worth it: the selection of heat is clearly not like the neighbors!
- To begin, prepare the base of the floor, removing from it all layers of the coating to the concrete slab. It is desirable to level the plate itself with a perforator or a grinder with an accuracy of 5 mm.
Note! A strong screed can be left, but then underfloor heating pipes will raise its level by about 50-70 mm from the original.
- The base is treated with waterproofing materials to avoid leaks.
- From above we lay a layer of polystyrene foam plates or special mats with clips for pipes.
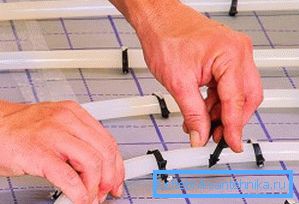
- Next, lay out a pipe made of polymer with high thermal conductivity. The optimum step of laying is 15 - 20 cm, and the pipeline configuration should be selected depending on the size of the room.
- In the wall niche we install a collector with an attached temperature control system. The instruction does not recommend customizing its work independently, so here you should invite a specialist.
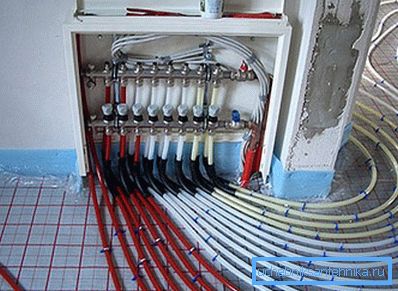
After connecting all the elements, we check the tightness of the circuits by supplying pressurized water to the heating pipes. If there are no leaks, we fill the floor with a new screed, and after it is dried, we place the floor covering.
Electrical system
Underfloor electrical heating is slightly different:
- As in the case of water circuits level the bottom of the floor. Waterproofing is not required here, but a layer of heat-reflecting material must be laid. Otherwise, we will not warm our apartment as much as the ceiling of the basement or the neighbors below.

- Next, lay the heating elements on the floor. They can be very different, and to facilitate the selection, we have brought the main characteristics into a single table:
| Electric heater | Special features |
| Resistive cable |
|
| Self-regulating cable |
|
| Heating film |
|
| Carbon rods |
|
The method of installation depends on the type of heating elements used:
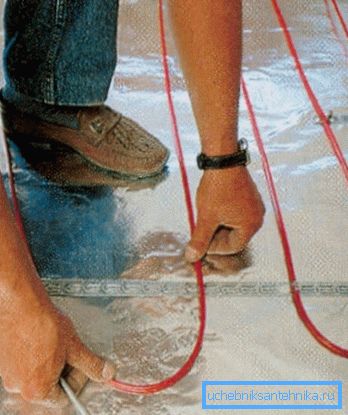
- We fix the cable floors to the floor using special fixing clips and attach them to the electrical grid. At the same time, we ensure that the integrity of the insulation is not compromised at the cable connections.
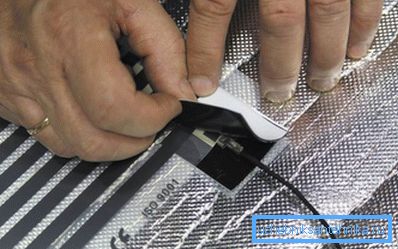
- The film floor is cut to size and connect the current-carrying strips on the films with contact wires. For the connection is very convenient to use special clips, which usually come with the floor.
- The core floors are also cut to the size we need, after which we roll the resulting mats on the floor. We connect each segment to the network through a thermostat that will provide automatic floor heating in the mode we need.
Above, as in the case of a water floor, a screed is poured. The exception is the film floor - on top of it is better to immediately lay the linoleum or laminate with good thermal conductivity (usually indicated in the labeling).
Conclusion
Even if your skills in working with pipes or an electric train are modest enough, you can still arrange heating in the floor. Naturally, for the success of the event, you need to prepare for it, so we recommend that you carefully study the video here.