How to disassemble the mixer: a step-by-step algorithm for
Perhaps, any professional plumber knows how to disassemble a mixer and how to fix it with minimal time and effort. But for a beginner, this task may seem rather complicated, so before taking up the tools, you need to spend time on theoretical training.

Preliminary work
Before you disassemble the faucet faucet in the kitchen, you need to prepare.
And the main thing here will be the determination of the type of device and the forecast of our further actions:
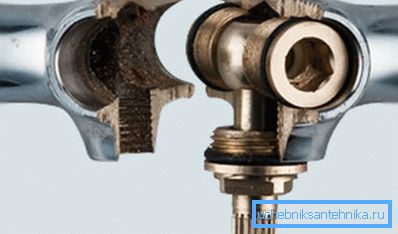
- The easiest to understand box cranes, which are usually equipped with two valves. For repair, you may need to either replace the gasket or install a new axle box, depending on what exactly went wrong.

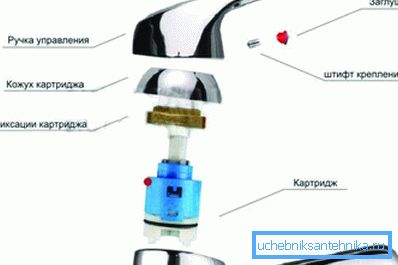
- It is somewhat more difficult to dismantle lever mixers with a cartridge.. However, if you complete the task once, then you will be able to replace the worn-out cartridge very quickly.
- Ball valves can also have a lever design, but most often such a device is installed as an adapter “shower - spout” in the bathroom. If necessary, such a crane can also be disassembled, and not only sealing rings are to be replaced, but also the valve itself.

Note! Some manufacturers make mixers according to the original schemes, but usually these models are detailed instructions for disassembly and repair. So if your crane has supporting documentation, be sure to read it.

To do the disassembly and repair their own hands will definitely need tools.
Before starting work we prepare:
- Adjustable prickly.
- Spanner wrenches of various sizes.
- Hex keys.
- Passatizhi.
- Flat and Phillips screwdrivers.
- Sanitary reel.
- Rags and rags for wiping water.
We will also need materials for replacement and repair - spare axle boxes, cartridges, gaskets, etc.
Method of disassembling different cranes
Buksovy
The story of how to disassemble the mixer in the kitchen, begin with a description of the simplest model.
Dismantling the axle model is carried out as follows:

- To begin with the end of a flat screwdriver remove the cover on the flywheel.
- Under the cover plate is a locking screw - unscrew it with a Phillips screwdriver.
- Remove the flywheel from the stock.
- Twist the pad, which closes the installation location of the axle box. It is best to do it with your hands, but if the thread is tightened too tight, you should use an adjustable wrench, putting a gasket under it to avoid scratches.
Next, we need to unscrew the bush. Here it must be remembered that it is the one that delays the flow of water, so that before disassembling the plumbing mixer, it is worthwhile to shut off the valve on the riser.
- Grab the bush with a wrench and unscrew, removing from the socket.
- If we have a crane with rubber gaskets, then we replace them. A buksu with a ceramic insert must be replaced completely.
- Install the part in place, screwing it all the way. If necessary, we tighten the thread by winding.
Note! It is not necessary to achieve a tight connection, tightening the thread with force - this can lead to breakage of the pipe, and the price of repairs will increase by an order of magnitude.
Supply water by opening the valve on the riser. If everything is in order - you can install the decorative plates and flywheel in reverse order. Now you know how to disassemble the rotary mixer and repair it.
Cartridge
The models in which a special cartridge is installed are arranged a little differently. Their main difference lies in the fact that the internal mechanism is actuated by one handle.
How to disassemble the lever mixer, tell below:
- We hook the decorative plate with a screwdriver, behind which the fastening screw is hidden.
- Using the key - hex, unscrew the screw that secures the lever lever type.
- We dismantle the handle, removing it from the cartridge.

Note!! As in the case of the axle design, before disassembling the kitchen mixer lever type, it is necessary to block the water.
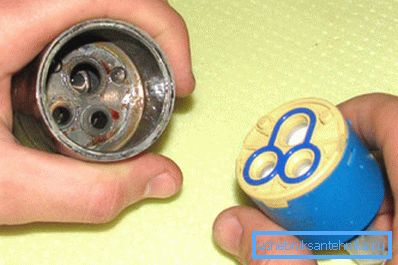
- The cartridge itself is usually fixed with two nuts. Remove them by grabbing an appropriate size spanner with a wrench.
- Sometimes the clamping nut has special grooves. In that case, to extract it, we may need either improvised means or pliers with thin sponges.
- We take out the cartridge from the groove, then, using the opportunity, we clean the internal cavity from impurities.

- Install the new cartridge in place and clamp it with nuts.
- We supply water and check the operability of the locking assembly and the quality of fixing all the nuts.
If the system regularly switches the flow of water and the leak is not detected - we put the handle on the cartridge stem and fix it with the fastening screw.
Sharovy
The ball valves with lever mechanism are serviced according to a similar scheme:
- Unscrew the fastening screw and remove the handle from the body.
- The key is to capture the mixer nut and unscrew it, then remove the centering gaskets.
- Remove the ball, capturing the stock with pliers.

After this, the mixer may need to be repaired:
- Or replace the spring-loaded gaskets on the inner surface of the housing.
- Or install a new sealing ring on top of the ball.
- After that we return the ball, the centering elements to the place and tighten the construction with a nut.
- As in the previous case, we check the tightness of the system and the operation of the crane, and then put the handle on the body.
But the question of how to disassemble the faucet in the bathroom, if you need to repair an adapter between the shower and the spout, is able to put many in a dead end. Although in fact there is nothing complicated:

- First, remove the flywheel adapter, twisting the locking screw. In most cases, to access the screw you need to remove the decorative cover on the flywheel.
- Next, unscrew the nuts, fixing the bottom spout, and on top - shower hose and remove these parts.
- Gaining access to the sealing inserts, unscrew them using a large hex key (12 mm). The availability of such a tool should be taken care of in advance, since usually the kit includes keys with a maximum of 10 mm.

Removing the inserts, remove the ball with an attached stem. Then we carry out repairs, replacing sealing inserts around the perimeter or clamping rings, which fix the ball valve. After this, we perform the assembly in the reverse order.

Conclusion
We hope that the tips given in the article on how to disassemble the mixer will be useful to you, and if necessary you can make simple repairs yourself. Well, in order to learn more about the design of kitchen faucets and methods of their dismantling, it is worth studying the video in this article.