How to mount the mixer to the wall
In order to mount the faucet in the bathroom to the wall, before that you need to perform a whole range of activities, which will depend not only on the connection of hot and cold water, but also on the quality of the attachment. In addition, there are two options for fixing, one of which is done on a plasterboard wall with a frame basis, and for the other one it is necessary to make grooves in the main wall, although in general terms the essence of the fastener does not change.
We will tell you about what the mount will depend on, how to do it in practice, and also demonstrate an interesting video in this article.

Wall mounted faucet
Little about their device
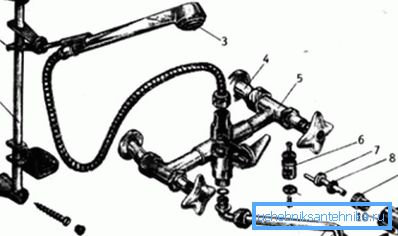
Note. All types and types of fixings for kitchen faucets, as well as bathroom faucets can be divided into several categories and, above all, by the type of adjustment - with one lever (joystick) and with two levers or wings. In addition, valves that are fixed to the wall can be divided according to the types of valves and fittings - this can be a cartridge, a ball valve or a crane box (with a ceramic pair (half-turn) or with a worm gear for the rod).

- Shower rod and stand for soap dish;
- Holder;
- Shower watering can;
- Pipe connection and fixation;
- The side of the case;
- Spool;
- Crank;
- Compactor;
- Special screw;
- Checkbox;
- Spout
At the moment, we are of little interest in the components of the crane and its valves in particular - for fixing the device are important connections that connect it to the fittings with hot and cold water.
The bar is also not very important - you can do without it, although the method of mounting this device is quite simple, so we will not even describe it - it can be clearly seen in the upper figure. But, back to the nozzles - the distance between their centers, regardless of the type of adjustment and type of valves, always remains unchanged 150 mm - this figure should be remembered, since it will be fundamental with further installation.

If the attachment to the sink of the mixer is carried out through the hole in the bowl, on the other side of which a nut or washer with studs is screwed, then fixing is done directly to the hot and cold water pipe fittings, and it is almost impossible to hold between their centers exactly 150 mm small shifts.
For this purpose, eccentrics were developed, which allow to extinguish errors by 2-3 mm to the sides or up and down. Threaded connections for such fittings with an offset center are always the same, but here the dimensions in length may differ, depending on the type of mixer.
Assembly work
Note. We will look at bathtub faucets with wall-mounted showers and their installation in the main wall. A similar installation on drywall is done similarly, only the whole structure is fixed to the metal frame.

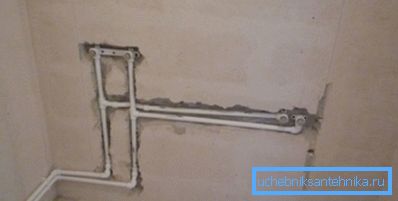
- Currently, not only plumbing, but also heating is mainly done by polypropylene pipes, so we will consider installing a plumbing fixture with this material. So, in order to bring hot and cold water as accurately as possible to the nozzles of the crane being installed, we can use a special polypropylene soldering bar with integrated fittings, as in the photo above. The distance between the centers here is maintained exactly - 150 mm and if during installation you knock it a little bit, then it does not matter.

- In order to properly combine the fittings with the surface plane, wall chipping and pipe installation can be done after the lighthouse plaster, but experienced plumbers usually do this even before plastering the walls - just the upper part of the pipe remains unused solution and can be pushed and soldered bar and lock in position. In fact, the order in which you will be doing all this is not regulated by any instruction, therefore, you can do it in a way that is more convenient for you.

- When soldering the bar to the pipes, try to fit the fittings on a horizontal level (if the wiring works are done before the plaster, the level is very easy to fix by playing up and down pipes). Now about the vertical plane - if the fittings are flush with the tile - this is the best option, but it needs to be calculated. In order for you to do this, the edges of the fittings from the lighthouse plaster or drywall should be 8-10 mm apart, but at the same time fix the bar well and close the threaded holes with plugs until you place the tiles.
- After installing the tile, you need to twist the eccentrics - in the middle, on the isthmus, there is a special square for capturing it with an open-end wrench (in different models, a wrench for 12, 13 or 14 may be required). To screw the eccentric into the fitting, reel it with a fum-tape and apply the UPIPAK paste on top - this way you will easily achieve a good sealing of the connection, even when you screw and unscrew the eccentric when adjusting.
Note. The height of the faucet above the bath is usually determined by 20-30 cm, but in those cases when you use one tap, the spout of which rotates from bath to sink, priority is given to the height of the sink.

- You put decorative washers on the eccentrics (you wind them up), but before doing so, combine them with the fittings of the mixer - this is not difficult to do, just use the spanner to rotate. So, after the centers have coincided and the washer is put on, you can attach the mixer with the nozzles to the eccentrics and gradually begin to tighten the nuts with your own hands on the principle of an American connection, just pay attention that the rubber sealing rings do not fall out.
- In most cases, experienced plumbers tighten these nuts with their hands, without using a key - this is enough to make the connection tight (this is possible thanks to rubber gaskets). After installation, open the water and check the joints for tightness. If you notice leaks - tighten the nut with the key.
Conclusion
In conclusion, I would like to say that the price of the mixer does not affect the quality of its installation - here the main accuracy and sequence of actions. And yet - in order to ascertain the quality of the installation, check the joints under the nuts with toilet paper - even the slightest leak will be immediately visible on it.