Install the kitchen faucet
By and large, a stainless steel kitchen faucet is a common appliance that can also be used for a bath. All the difference here is not in the appointment, but in the valves, which is equipped with a particular tap, that is, you can open water using different mechanisms. Below we describe these devices and show the video in this article, taking into account the topic.

Kitchen taps
Valves

- If you buy a steel or copper faucet for the kitchen, which is regulated by two valves or two levers, you can be sure that there are faucet valves as a fixture. At the same time, the half-turn mechanisms of the axle box will necessarily be ceramic, more precisely, with a ceramic pair of plates, and if 5-10 turns are provided for adjustment, it means that there is an axle box with a worm gear.
- Ceramic pair consists of two plates ground to each other with holes that are offset from the center - mobile and fixed. The movable plate rotates around its axis by means of a rod, which, in turn, is driven by a thumb or lever and the holes can be aligned, increasing the water passage, or diverge until the passage is completely blocked. Due to this displacement, the intensity of the water flow is regulated.
- In a worm gear axle box, a rubber valve is located at the end of the rod, which is lowered onto the bore and can partially or completely block it - this process regulates the jet power. The number of rod revolutions here mainly depends on the thickness of the rubber, which flattens out over time and needs to be replaced.

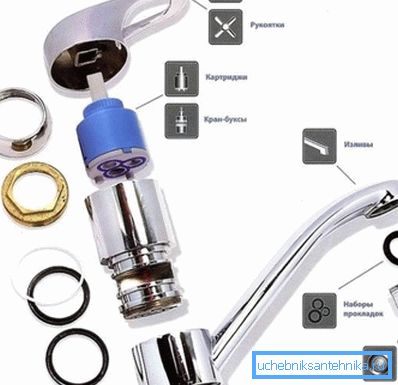
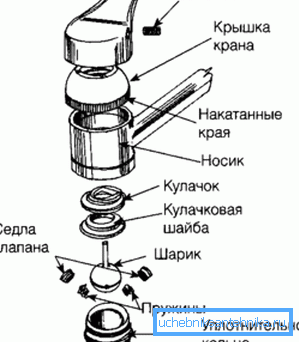
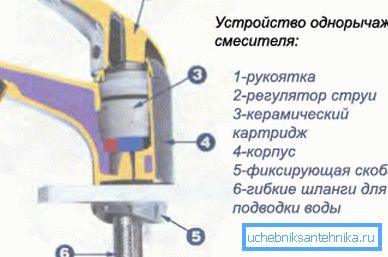
- If you purchased a chrome or matte chrome kitchen faucet, which is controlled by one lever, it means that there is either a cartridge or a ball with holes in it as a stop valve. The principle of operation is very similar: both mechanisms have two inlets and one outlet each, but here the flow regulation takes place differently.
- The capacity of the cartridge is set using a movable plate - when it is rotated to the right and left, openings and openings are closed and closed, where cold and hot water flows in and this is how it mixes. But the intensity of the jet is regulated by moving the plate forward and backward when raising and lowering the joystick handle. The cartridge itself is stationary.

- In contrast to the cartridge, the ball is a moving part and, depending on its position, increases or decreases the cross section of the inlet as well as the outlet. Such mixers have a higher price, but the service life also increases.
Assembly work

Recommendation. To begin with, it is best to install any conventional or built-in kitchen faucet on a sink that was removed from a cabinet or cabinet - this provides free access to fasteners. If you are confused by the connected siphon, then this is not a problem - it is very easy to disconnect - just pull the corrugated hose out of the sewer system fitting.

When installing, first of all they screw the hoses - they are supplied with a faucet, but most plumbers do not recommend using them because of the unreliability of the metal braid, which is susceptible to corrosion. If this screen is damaged, then in such a place the rubber wall of the hose will bulge and it will eventually burst, and you will get all the ensuing consequences.
More reliable are metal corrugated tubes, which you can purchase separately, and their length is chosen according to the distance from the pedestal of the sink to hot and cold water fittings. Also for this purpose it is good to use metal-plastic, which is connected to the mixer using needle adapters, these needles are simply purchased separately.
All adapters of this type have sealing rubber rings (usually two pieces each), which make it possible to dispense with the use of fum-tape, tow (hinge) and sanitary paste Unipack during installation. Adapters are screwed in (with or without hoses) with a 10-wrench wrench. You can also use pliers for this purpose, although this is not very convenient.

To push the hoses through the hole in the pedestal of washing, they are turned on one at a time, since the end fittings are much wider than the tubes themselves, but this usually does not cause problems.
The mixer can be fixed to the sink using one large nut, or using a figured washer, which is pressed by two studs and locknuts screwed on them. And in one and in the other case, a rubber gasket is placed under the mount.

When the mixer is screwed to the sink, it can be lowered onto the cabinet (cabinet) and screwed adapters to the fittings with cold and hot water. The connection of the mixer to the fittings is carried out using a fum-tape and sanitary paste Unipack.
Recommendation. To check the mixer for leakage, it is good to use toilet paper. You simply apply it to the compound, and if there is even the slightest leakage there, it will immediately darken from the water.
Repairs

If you have installed a color kitchen faucet for granite or a regular chrome model with single-lever control, then sooner or later, its stop valves will become unusable. But this does not mean that you need to replace the valve with a new one - it can be repaired by changing the cartridge or the ball repair kit. To do this, you need to turn off the hot and cold water, and then remove the joystick lever.
This handle is fixed to the rod of the ball or cartridge with a screw, which is located under it and is closed with a red-blue decorative cap - it can be seen quite well in the top photo.
You need to pry the cap with a knife or screwdriver, and then make three turns of the screw counterclockwise - this will be enough to loosen the mount to the degree of lever removal. The screw can be with a slot for a minus screwdriver, but it can also be with a hex socket, but in this case you can also use a screwdriver if it is tightly fixed there diagonally.

Removing the handle, you will release access to the decorative dome nut, which you will need to unscrew counterclockwise. After it unscrews the locknut, which locks the valves in the housing. You can now remove the cartridge or ball along with the cams and springs to replace it.

If you cannot read the dimensions of the fittings (D28, D35 or D46), then you should take it with you to the store for fitting. Some try to repair the cartridges by disassembling them, but this is too troublesome - it is much easier to buy a new one, and if you estimate how much the mixer costs in the kitchen compared to the cartridge, then you will see the benefits.
It is also worth doing with the ball valves, that is, to change it entirely, besides, you will hardly be able to purchase such parts separately, since they are simply not available for sale.

But if you have a faucet with cranes, then you can not only change such valves, but also repair them with your own hands - it's a blessing, it’s not hard to do. To do this, first of all, after overlapping hot and cold water, you need to unscrew the valve on the side where the leakage occurs - the screw is located in the center of the lamb under the decorative cap or under the lever handle.
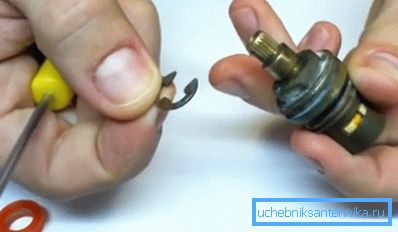
Further, all actions are also similar to disassembling the joystick crane - unscrew the decorative dome, and the locknut behind it, if the axle box is not removed after this, it means that there is an additional fastening - the retaining ring, which also needs to be removed.

Now you need to disassemble the crane-axle box and to do this, remove the lock washer from the rod, and then, pressing on the rod, remove the sealing rubber ring and the ceramic pair from the body. Basically, the cause of the leakage is to squeeze the ring to seal - over time it flattens and does not hold water. It can be replaced with a new one, but you can go another way.

In order to make a good hold of the rubber ring, two or three layers of electrical tape are glued onto the movable ceramic plate - this is the place indicated by the arrow in the top photo. Thus, as if you increase the length of the rod, and the ring tightly overlaps the joint. You can also make a washer from copper wire and place it under the ring, thereby increasing the hold-down.
If you have a worm gear axle box, the cause of the leakage in most cases is a rubber valve that blocks the inlet. It can be replaced with a new one (the cost is a cheap one), but you can also cut it yourself out of thick thick rubber. Also, the instruction allows you to use this valve further, but you will need to put a washer under it.
Conclusion
In those cases when you have a kitchen faucet with a shower, the repair and replacement of the tap is similar. The fact is that the valves are the same for all models and only its dimensions are different.