Concrete drainage trays most
Trays for drainage are used in places that are known for abundant precipitation all year round, as well as in areas with clay soil. Since water flows after heavy rains and melting snow wash off a layer suitable for growing various crops, it has to be filled from time to time and purchased black soil for this purpose. These trays help to eliminate such a problem by creating a system through which wastewater will be removed along the trays, rather than spreading over the area. In this article we will explain how to make concrete drainage trays with your own hands.
Device drainage system

Such systems, arranged on the site, can be performed using different schemes. However, it is important to consistently follow a number of important rules:
- the slope of the trays when installing the rain sewer should be approximately 10 mm per linear meter;
- the smaller the angles in the drain and turns - the better;
- moisture should not drain into the garden: on the contrary, it should be removed from it.
In those cases when a rather complicated drainage has to be done within the boundaries of the vegetable garden, where perennial trees or extensive shrubs grow, then the best option in this situation is a system with ramifications. How she looks like? Water flows from the site in two places, therefore, the output will be not one, but two.
It can also often be that the surface of the entire plot is rather uneven, therefore making a normal slope there is extremely difficult. In this case, the drainage system is made differently - all the slopes that will occur when laying concrete drainage systems must correspond at each elevation of the site to the height that is there.
For areas with a more or less flat surface, a standard drainage pattern is used, known as linear. They dig several channels parallel to each other, after which they are connected at the point with the lowest slope.
Shape Mold Device

To understand how to make concrete drainage trays, it is necessary to understand the principle of their action. In autumn and winter, a considerable amount of precipitation falls on the plot near the house or cottage. Subsequently, they spread over the adjacent territory, flooding the lowlands, creating dampness in the basements and spoiling the decoration of the walls. If around a private house there are correctly made concrete trays, then the water will drain through them and then be drained away without creating problems on the site.

What are the advantages of concrete trays that are made by you personally? First, it is a savings. Although it is not very easy to make them, it will be cheaper than buying such factory-made trays in the store. Secondly, these are individual sizes, because some trays from the store will have to be cut if there is a turn of the drainpipe, and at home you can pour trays of the desired length and shape.
By the way, about the form. The optimum is considered to be a semicircular shape, in which water passes with virtually no resistance. However, since it is not easy to make such a shape, trays are most often made as follows. From boards or sheets of laminated plywood with a thickness of 10-15 mm make the design of the U-shaped. To give strength shields in formwork fasten corners of metal.

When the main part of the formwork is made, prepare the molding part, which is made from a pipe, cut in half along. It is important that the surface of the pipe used is smooth, since it will form a semicircular part of the tray through which the waste water will flow. It is best to make at least 10 such formwork, otherwise the process of pouring trays for the entire drainage system can be delayed indefinitely.
A sewer plastic pipe of a suitable diameter is ideal for the molding part, since its surface is smooth. There is practically no pore on such a pipe, which makes it possible to pour concrete much better.
Filling trays in the form

Now the formwork is fully prepared and it is possible to deal directly with the pouring of concrete trays, from which drainage will be installed later. For concrete, you will need the following materials:
- Portland cement M400 (characterized by high strength and resistance to frost).
- Sand without clay impurities.
- Crushed stone
- Fittings O 6 mm.
The ratio of cement, sand and rubble can be used either as 1: 2: 4, or 1: 3: 5. The last ratio allows for the same amount of cement to get more concrete, but its strength will be slightly lower than in the first case. The resulting solution should be quite viscous, but not leak and not be too thick.

Why do you need fittings? It allows you to significantly increase the strength of the future structure, and also will not allow the tray to break when it is removed from the formwork. Due to the reinforcement or the grids, rather long trays can be made from it.
Trays are made in four approaches:
- First, prepare the form in which the tray will be poured (or several at once), as well as the molding part.
- Reinforcement is made and placed in the form (several longitudinal rods or mesh).
- Knead and pour into the formwork solution.
- After the concrete has set, the formwork is removed and the ready drainage trays are removed.

When choosing screws or nails, it is important to choose the right length. It must be large enough to securely fasten the structure. If in some place the screws or nails go inside the formwork, then their length should be somewhat shorter - subsequently they will not allow the tray to be pulled out of the formwork and may even damage it, breaking off a piece of concrete.
So that the water in the concrete mix does not flow through the bottom and walls of the formwork, they should be covered with plastic wrap, preferably with a thickness of at least 200 microns.
Necessary tools and devices

To prepare the concrete for pouring and the trays themselves, you will need certain tools. These can be devices that operate from a 220 V electrical network, as well as hand tools:
- two shovels - Soviet and bayonet;
- trowel or trowel;
- a car or a bucket, with the help of which the concrete can be transferred and poured into the formwork.
From power tools you need the following:
- a concrete mixer (if not, you can temporarily ask your friends or rent it);
- perforator or hammer drill, as well as a nozzle for the mixer (if there is no concrete mixer, and the solution will be kneaded by hand).
Shovels are needed to pour mortar into the concrete mixer, and then pick up concrete from the wheelbarrow and pour it into the formwork. A trowel usually aligns the top layer of the tray to be filled
Reinforcement and tray fill

Making a grid of reinforcement rods, it is necessary to locate them at a distance of 5–10 cm from each other both vertically and horizontally. The mesh can be interconnected by knitting wire or welded by electric welding. To prevent the reinforcement inside the tray from rusting or rotting, the edges of the rods should not reach the walls of the formwork and the molding part by 5 cm.
When the reinforcement has been laid, the formwork can be poured. How to make concrete, it was described above. It is advisable to use a building vibrator during pouring, an apparatus necessary for compacting the concrete and removing air bubbles and excess water from it. If it is not there, you can take a piece of reinforcement or something similar, and with this, tamp the concrete with up-and-down movements.
When the concrete is poured, it is necessary to immediately use the molding part of the pipe, through which the top of the form will turn out in the form of a semicircle. For a better effect, you can powder the top of the cast form with dry cement, which was used in the manufacture of concrete, to “iron” the surface, that is, to give it greater strength. A pipe can not just be squeezed into a fresh mixture, but scrolled several times in different directions, without pressing too much - so the semicircular surface will have greater smoothness.
For full hardening of concrete, it takes 28 days. However, within a day, the formwork can be disassembled - the concrete has reached the degree of pre-solidification, that is, it has not gained full strength, but it will not fall apart in hands. The resulting tray should be rectangular in shape, and its internal cavity is semicircular, smooth, without pits, cracks and other defects.
Tray installation
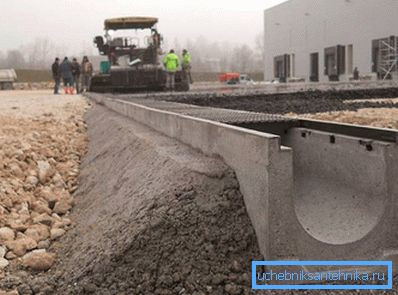
Before laying the trays, you need to dig for them a rectangular trench in accordance with one of the selected installation schemes. The bottom of the excavated trench is filled with a small amount of sand (the so-called sand cushion) to make it easier to adjust the slope of the tray.
The slope of the trays is measured in two ways - a level or level with a bar (rail) tied to one of its edges. The second method is more imperfect, but it will help those who do not have a level. When the slope is adjusted along the entire length of the trenches, trays can be laid. In the end, you can test their performance by pouring there first only water, and then water mixed with sand (imitation of effluent after stormy rains). If nothing remains in the trays, then everything is done correctly.
If the trays pass near footpaths or through concrete, they can be covered with trellises that will not allow debris to accumulate there, as well as secure movement of people.
Video
This video shows how to make concrete trays at home: