Drainage at the cottage itself
Water plays an important role in the life of humans, plants and all living organisms. Every owner of the summer cottage knows that without water he will not grow a good harvest. Moisture promotes the growth of plants and trees, but its excess can be detrimental to them. Excess moisture in the soil can be from the surface occurrence of groundwater, frequent rains, after heavy melting of snow in spring. Moisture-saturated soil can have a detrimental effect not only on plants, but also on residential buildings, sewers, and wells with drinking water. Therefore, if you notice in your summer cottage a constant dampness from a large amount of moisture, you need to urgently take measures to combat it and think about building a drainage system. Let's take a closer look at the whole construction process, so that you can make sure that every summer resident can build a drainage system in the country with his own hands.
Types of drainage

Before you start building a drainage system, determine which factor affects the increased moisture in your area. If rain and spring snow melt affect the excess moisture, then you can do with the construction of surface drainage. Sometimes it is called storm sewer. But when you do not dry out all year round in the yard due to the surface occurrence of groundwater, then you cannot do without a deep drainage system.
Surface drainage
Surface drainage consists of point and linear sewage.
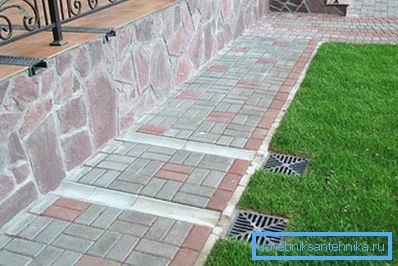
- Point sewerage involves the collection of water from the roofs of buildings and platforms with a hard surface in the reception pits. After collecting, the water is drained into the drain.
- Linear sewage collects water from the entire yard and all discharges. The collected water along the gutters is sent to a ravine or septic tank for recycling. Recycled in the septic tank rainwater is used for watering the garden.
Installation of surface drainage

- Before construction, calculate the entire drainage system. Make a laying scheme for the drainage line so that all the water flowing from the roofs and asphalt paths falls into the drainage line.
- Prepare the place where the wastewater will go. It may be a ravine or septic tank for wastewater treatment.
- Decide on the material from which you will build drainage. These can be grooves with overhead grilles or drain pipes.
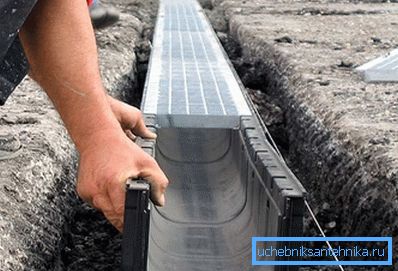
- After careful preparation, dig a trench around the perimeter, where the drainage line will pass.
- Cover the bottom of the trench with a 10 cm thick sand pillow and level.
- Place the grooves in the prepared trench, so that after filling the removable grille is on the surface. The grooves are laid at an angle to the drain. The tilt angle is calculated, as well as for laying sewer pipes - 2 cm by 1 linear meter.
- If you decide to drain the pipes, they are laid a little deeper than the grooves. You can use pipes with drainage holes to simultaneously collect groundwater.
- To avoid clogging up the system, install special filters to delay garbage. In places where filters are installed, provide a well for cleaning. Also install inspection pits at all the turns of the drain.
- When installing grooves or pipes, make a tight connection. Otherwise, the water on the loose connection will wash itself another way.
- After completing the entire installation, fill the gaps between the walls of the grooves and the ditch. Cover the top of the grooves with bars. If the drainage is made of pipes, bury all the pipes, leaving only water collecting funnels on the surface.
Deep drainage
Deep drainage, as well as superficial, performs the same role. Only he collects and removes groundwater. The principle of its construction is similar to surface drainage, only instead of grooves drainage pipes are used to collect groundwater.
Installation of deep drainage

- Before installing the drainage system, it is necessary to find out the depth at which the groundwater flows. At this depth and will pass the drainage pipe.
- After completing the markup, dig a trench at the same angle as for surface drainage.
- At the bottom of the ditch you place the geotextile tape in such a way that it is enough to wrap the pipe covered with rubble.
- Tightly connect the drainage pipes and lay in a trench.
- After mounting the entire system, cover the pipe with rubble and wrap it with protruding edges of the geotextile tape.
- On top of the tape pour once again an arbitrary layer of rubble with sand. After that, fill the entire trench with the soil and level it.
At this laying drainage ready. As you can see, this is a fairly simple job and every summer resident can do it. In this article we looked at how to make drainage in the country and the order of installation. Do not forget to periodically clean the system and filters for quality work and to avoid clogging.
We also recommend you read the articles:
- The organization of surface drainage.
- Surface drainage area with their own hands.
- Reservoir drainage.
- Drainage of the site on clay soils with their own hands.
- Types of drainage.
Video
This video demonstrates the installation of surface drainage systems:
Drainage plot? tips and tricks for arranging: