How to make a bath drain
An integral part of the steam room is water. But so that she does not stagnate, it is important to know how to make a drain in the bath. At the same time it is necessary to take into account certain nuances. For buildings that are located on piles, a thoughtful approach is required so that communications do not freeze. Depending on the load on the room, various decisions will be made.
Before construction

It is worth thinking about the sewage system even before the laying of the foundation begins. In this case, it will be much easier to conclude. It is necessary to analyze such moments:
- What is the size of the planned structure?
- What is the frequency of its use?
- How many people will be inside at the same time?
- Will the toilet be installed?
- Will washing a separate room or combined with a steam room?
- What is the depth of soil freezing?
- What is the composition of the soil?
- Is there a central sewage system?
- How much free space is there around the bath?
This questionnaire will greatly simplify the creation of a drawing strip, and will also provide an opportunity to determine which of the options that will be described below is best suited to a particular situation.
Briefly about the floor

A great role in how effectively all the moisture will be removed from the steam room or washing room is played by the correct approach to making the floor, as well as the drain hole. Flooring can be wooden or concrete. The first, in turn, is divided into:
- leaking;
- impermeable.
The essence of the leak is that between the boards there is a space through which water can simply merge under the building. This solution is suitable for the southern regions. In the second version, the boards are stacked in two layers with tight joints. In this case, the slope in the direction of the groove or drain hole is observed.

Concrete floor necessarily performed with insulation. If this is not done, the legs will be very cold. When pouring in the same way as in the case of a leaky wooden floor, the slope is observed towards the drain hole or in the middle where the chute will pass. In addition, wooden lattices are placed on top to make it more comfortable to stay in the room.
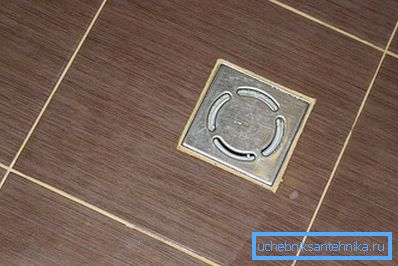
Ladder

The ladder for different designs will also be different. If it is a bath that is constantly heated, or it is known that the room does not freeze, then you can install the product with a water valve. It is usually located in the corner or in the middle where all the liquid is going. It will not be difficult to install such a construction into the wooden floor:
- Work is carried out before the floor is installed.
- The location of the drain hole is chosen according to the slope of the surface.
- The marking under a ladder is made.
- A hole is drilled in order to be able to insert a jigsaw nail file. Cut the opening under the product.
- The entire surface of the floor is covered with thick plastic wrap.
- A slot is made in the place where the drain hole will be.
- Plastic drain is mounted in place.
- The junction of the film is coated with silicone sealant.
- The flooring is finished.
Tip! With this solution, even if water somewhere seeps under the floor, it will flow down the oilcloth to the place of discharge.
But most often baths are used less often and if you make a similar construction there, then it can be fraught with the fact that the water inside will freeze and the product will simply tear to pieces. To avoid this, you can make a ladder with a barrier without liquid. One solution is easy to implement in a wooden bath, the other in a concrete floor bath.
For wood:
- You will need a small sheet of galvanized metal measuring 62? 38 cm.
- It must be marked out as follows: from each edge, set aside 2 points at a distance of 10 cm. The points of the two sides must coincide so that a square with a side of 10 cm is formed on the corner.
- In the resulting squares from the angle to the point is a diagonal.
- All points are connected by a line to make a rectangle inside. These tags will serve as a guide for the fold.
- At a distance of 17 cm from the edge of the smaller side in the middle of the sheet we make a notch. This will be the center of the hole for the pipe, if it is 50 mm in diameter.
- Now, along the lines drawn, it is necessary to bend this sheet to make a small trough.
- The sharp edges sticking out on the sides are bent to the larger side.
- Inside is laid plastic or wooden plank. In size it should be 39? 17? 0.5 cm.
- The capacity of this container is about 6 liters. When the water begins to drain, it raises the bar and freely falls into the hole. After the level falls, the plate falls into place and closes the hole. This is done so that there is no smell.
- Even if it happens that the board freezes to the trough, then when hot liquid gets in, it quickly thaws.
Tip! Such a drainage mechanism will be very relevant for baths, which stand on a pile or column foundation, when there is a minus temperature under the floor.
For concrete:
- In order to implement the project, you need a plastic or durable rubber ball.
- When the floor is to be filled, it will need to be placed above the drain hole and slightly drown it there. Above it, you can press something so that it does not move.
- An additional bias is created around the ball.
- In this position, the ball remains until the screed fully solidifies. After it is very easily separated from the frozen mixture.
- That he will serve as a shutter. When the water begins to flow, it will lift the ball. After that, it will fall into place and close the opening, preventing the penetration of unpleasant odor. This should not freeze, and if it does, it thaws quickly enough.
Simple water collection systems

The simplest solution for draining the fluid will be the solution for the flowing floor.
- A pit is dug under the steam room (or the sink, if they are not combined). Its size will coincide with the area from which water will flow.
- It is necessary to deepen it slightly below the freezing of the soil. Layer in 10 cm sand is laid on the bottom and is well rammed.
- The rest of the space is filled with crushed stone or expanded clay, so that there is still 10 cm to the top. Everything is carefully rammed.
- The rest of the space is filled with soil that has been dug.
There is no need to do anything else. The liquid will fall into this pit, be filtered and go further into the soil.
Tip! This design will be relevant if the bath is used no more than once a week and at the same time there are 3? 4 people in it. In the case when the soil under the bath is clay, then it will be necessary to make a transition pipe to the pit, which can be located a few meters from the bath.

To implement the next idea, you need a plastic or metal barrel with a volume of 200 liters.
- Chosen a place near the bath.
- A pit is dug to a depth below ground freezing. Its diameter should be 30 cm larger than the diameter of the barrel. This is necessary for ease of installation.
- At the bottom, a layer of sand is laid in 10 cm and is well rammed.
- A layer of fine gravel fits another 10 cm and is also well rammed.
- In the side wall is cut a hole under the pipe, which will drain the water.
- A hole is drilled in the bottom with a drill and a 26 mm drill. It is necessary for the ventilation hose.
- The nut is screwed onto the nozzle and the gasket is put on. It is pushed through the hole. Another gasket is put on and the whole structure is fixed with the help of a second nut.
- The barrel is placed in the pit upside down.
- Drain pipe supplied. It is advisable that she go inside by 15? 20 cm. Thus, when the ground is displaced, it will not pull out.
- Approximately to the middle, the pit is filled with rubble and rammed, but so as not to damage the barrel. The remaining space is filled with soil.
This disposal method is also suitable for non-clay soils. Capacity is quite enough to take a bath at the same time 5 people 1 time per week.
Systems with intensive use

In cases where the bath will be operated in a more intensive mode or there will be a toilet in it, it is necessary to provide solutions by which the system will cope with a large volume of fluid. If the building is located near a private house and VOC is provided for it, then you can draw a conclusion directly into it. The quickest way to prepare a single-chamber septic tank or cesspool, for this you need:
- Dig a pit. Its depth should be just over 3 meters so that 3 concrete rings can easily fit, and they do not reach a surface of 30 cm.
- If the bottom is planned to be made filtering, then a bedding of 20 cm of sand is made, a layer of rubble is placed on top of 30 cm. Everything is well rammed. If not, then a layer of 20 cm is poured concrete and rings are immersed in it.
- The walls can be strengthened in another way, for example, laid out of brick. At the same time it is necessary to do the laying with holes for water drainage.
- A suitable hole is made to enter the sewer pipe.
- Above the pit is closed with a reinforced concrete slab.
- A fan pipe is installed in the cover for ventilation.

Such a septic tank is cleaned with a vacuum. You need to have it so that there is an entrance to it. The distance to the building should be at least 2 m. It is possible further, but then you will have to lay communications to a greater depth.
In order to increase the interval between cleansing, you can make several cameras. In this case, the water will be cleaned more efficiently, and the opportunity to increase the volume of average daily flows will also be available. The essence of the device is to make the first two containers sealed by the described method, and the last to do with the filter bottom. At the same time they are interconnected by means of pipes. In the first and second compartment, heavy particles settle. There they are decomposed by bacteria. Partially purified water enters the third section, which goes further into the ground.

Tip! Here you can get more information about the principle of operation of the septic tank and its device.
In another embodiment, you can use plastic containers or buy a ready septic tank. Also, the output of effluent from the last camera can be carried out on the filter fields. For this, sufficient space should be available for their organization.

The most expensive option is to install the finished system. All actions it performs automatically. At the exit, cleaning reaches 98%. Water is drained by a drainage pump. She can water the garden or vegetable garden, except for fruit and berry plants. The installation of such a unit is reduced to the preparation of the pit and the supply of the drain pipe. Also need electricity for compressors. It can be located near drinking water sources.
Video
Watch a video on how to make a bath in a 200 liter barrel bath:
A photo


