How to strengthen the ditch in the country
Many gardeners in the arrangement of the territory are faced with this problem. The presence of groundwater, marshy soil leads to the creation of a drainage system. Moreover, the flooding of the site occurs for other reasons. Stormy rains or heavy melting of snow in the spring leads to flooding of the house, basement or other utility rooms.
But before you strengthen the ditch in the country, you need to carefully familiarize yourself with its structure and choose the most suitable option for fixing the walls.
Ditch device

Creating an effective drainage system requires at least two independent networks.
- Linear is designed to drain directly the site itself. Usually it is erected when there is a constant flooding. From the upper topographic point, one should separate the branches of closed trenches, while ensuring a slope of 5–10 mm per meter. All water enters the open drainage system.
- The second independent network should protect the foundation and basements of the house. Here the point of reference is the far corner of the building. The drainage ditch along the perimeter should also have a slight decrease of 0.5 percent. To cover it use turf or concrete pavement tiles.
- Any trench of this system must be at least 50 cm deep and wide. Next to the foundation, this indicator may be higher. For the device drains use such a simple way as fascines (these are bundles of twigs and branches) or wooden boxes.
- To strengthen the bottom often use gravel, crushed stone or just sand of different fractions. But at the same time, the walls of the ditch periodically settle and fall off. Today, there are several effective ways to avoid this.
The main ways to strengthen
Before you choose a reliable method, it is worthwhile to carefully measure the angle of inclination that the walls of the ditch have.

- If the angle of the slope does not exceed 8%, then it will be enough to strengthen it with the help of various plants.
- Biomats or geogrids are used at steepness from 8 to 15%.
- If the angle exceeds 15%, then there is no way to do without geogrids and gabions. True, with a shallow depth, you can just use the stones and drive them into the slope.
Using slate and tires

One of the easiest ways to strengthen the walls of the ditch can be an ordinary slate.
- In addition to the sheets, you will need metal pipes or fittings, a shovel and scrap, as well as a Bulgarian and a respirator.
- With the help of the Bulgarian sheets are cut into identical pieces. They are placed directly in the ground at a depth of 25–30 cm straight or with a slight inclination. Sheets at the same time should fit snugly to each other.
- Reinforcing bars are driven in from two sides in a checkerboard pattern. Best of all, if they are before it will be treated with an anti-corrosion compound or paint.
- Western builders have come up with another inexpensive way to strengthen with automobile tires. Old tires can be laid in rows and fasten them together. The stakes hammered in the middle will give additional durability. The space inside can be filled with soil, but it is better to use sand or small gravel. It is useful for voids between the tires.
- There is another way. Tires can be laid in several rows. In addition, each overlying shifts by half the diameter. Then the tires also fall asleep. The use of tires is very cheap, especially if you can get them for free or for a pittance.

Of course, you can not count on too long service life, so you should look at the more expensive, but reliable materials.

Installation of geomats and geogrids

Geo- and biomats are nothing more than polymers with a waterproof structure. Polypropylene lattices under the action of high temperature superimposed on each other. This structure is more like a sponge, but this is done so that various plants can grow through the holes.

- At the first stage you should prepare the slope itself. It is necessary not only to level it, but also to clean it of any garbage.
- Geomats are sold in rolls, so the upper edge is combined with the upper part of the ditch and fixed there with anchor bolts.
- Roll roll to the bottom, and then cut and secured with anchors.
- The next roll should overlap with a tolerance of about 15 cm.
- Then you need to fill up everything with a small layer of soil and use seeds for sowing. Usually enough 40 grams per m ?.
- The geogrid is also available in rolls. It has a polyester base and square cells. For installation, you will need a tape measure, marker, scissors, hammer, as well as a rake and a hand roller.
- It is with a skating rink that they well tamp and level the surface of the slope.

- Each roll should be cut into a certain number of pieces, then tightly lay them on the slope directly to each other. For fastening use anchor metal rods or staples. They are especially needed in those places where there is a high probability of strong wind.
- The geogrid is also covered with a layer of soil and plants such as periwinkle, mint or mshanka are planted. True, you can just use fine gravel or pebbles.

But for more durable reinforcement will need the use of geogrids.
Geogrid installation
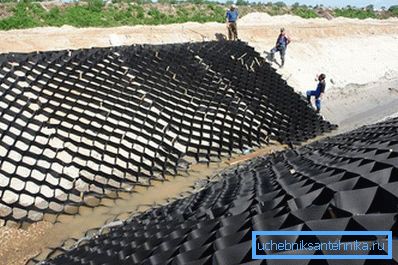
Its basis is polypropylene and polyethylene. This alone suggests that it is a very high-strength and durable product. In addition, the geogrid is not afraid of corrosion and can last for many years.
- Since the cells of the geogrid can be stretched both in length and in width, their tight adhesion to the ground or rubble occurs. In addition to rolls, anchoring hardware, scissors, a hammer, as well as fine gravel and sand will be required. Perhaps you will need a pump.
- Installation work can be carried out only in the case when the drainage ditch is not filled with water and all slopes are completely dry. Therefore, it is necessary not only to pump out the water, but also to prepare the surface. It is necessary to remove all debris, large stones and branches. In this case, small grass can not touch.
- The geogrid is spread over the entire length of the ditch. In this case, an unnecessary piece should be immediately cut off.

- The most important step is considered correct consolidation. After all, then the service life will be at least twenty years. Fasteners can be bought or made yourself. To do this, use hooks from conventional fittings. The thickness should be 1.5 cm, and the length - 50-110 cm. Such hooks are placed at a distance of 30 cm from each other in a checkerboard pattern.
- It remains only to secure all the cells. Sand is suitable for a dry ditch. If it is often filled with water, it is best to use crushed stone or river pebbles. Even better, the slopes will be planted with ground cover plants. Over time, this will lead to even greater adhesion to the geogrid.

The most expensive, but the most successful solution may be to strengthen the slopes of the ditch with the help of a gabion.
Advantages of gabion

This factory product is a product made in the form of a parallelepiped of double twist metal mesh and filled with large stone or rubble.
- For the manufacture of the gabion at the factory, special galvanized wire is used, which also has PVC coating. It was she who reliably protects this structure from corrosion, aggressive chemical environment and mechanical damage. Even large loads are not terrible. The average lifetime can be more than 70 years. But it affects the cost.
- Therefore, you can make a gabion on your own. For this, reinforcement rods having a diameter of 6 mm, as well as electric welding, will be needed. In addition, you need to stock up on a tape measure, marker, grinder, netting, spade and wheelbarrow. Cobblestones are also required.
- The design with dimensions of 80? 40? 80 cm is suitable for a small area. Armature rods are welded together, forming a rectangular shape. The width of the cells will depend on the diameter of the selected stones.

- With the help of a shovel it is necessary to prepare and extend the slopes of the ditch. Only then can be placed along the entire coast of the cell.
- Each cell is filled with large cobblestones and, if necessary, several rows are installed at once.
- The netting net is attached from above for better fastening. To avoid the need to change it often, it is better to choose a grid that will also have a PVC coating. From above it is easy to reinforce with the help of cobblestones. In addition, it gives the whole structure a nice decorative look.

Gabions can serve the longest, while they fit well into the ecosystem. Manufacturers guarantee at least one hundred years of service.
Arrangement of the drainage system
Before you begin to strengthen the walls of the ditch, it is necessary to properly equip the drainage system itself.

In addition to creating the desired slope, it is necessary to properly make the bottom of the trench. Sand and small gravel are used for this. With their help, the necessary cushion for the drainage pipe is made.
It is protected by a bulk crushed stone filter, as well as geotextiles, which protects against ingress of excess debris and soil.
Ceramic or perforated asbestos-cement pipes are used most often for drainage. But recently, plastic gutters have also been used.
Tip! Do not forget about the drainage well, which will drain the excess water. After all, the ditch, in which water is constantly located, begins to collapse the fastest.
Modern materials will allow to strengthen well all the walls of the ditch, and then the threat of flooding will be reduced to almost zero.