Connecting the gas boiler to the chimney
The chimney in the composition of the gas-fired heating system is used, as is well known, for the removal of combustion products from the boiler and is a special shaft with a pipe mounted inside it. In this article we will discuss how to connect the gas boiler to the chimney.
To the design of the outlet channel itself, as well as to the order of its connection to gas equipment, a number of requirements are presented, which are as follows:
- vertical chimney sections should be installed without any slope;
- there should be no restrictions or expansions inside the flue duct;
- for its manufacture, special heat-resistant materials should be used, preventing any cracks and mechanical damage from forming on the walls of the structure;
- in the design of the chimney can not be more than 3 bends of the discharge channel;
- when connecting it to the gas boiler, special sealants must be used, designed for operation at high temperatures;
- The parameters of the discharge channel (the height of the pipe and its diameter) must correspond to the characteristics of the working boiler, which is a prerequisite for obtaining the necessary thrust.
Outlet Channel Device
Proper connection of a gas boiler is possible only after a preliminary familiarization with the design of typical channels for discharge of combustion products. For arranging such channels, as a rule, the following set of precast parts is used:
- special design adapter, through which the boiler is connected to the chimney;
- special inspection hatch mounted in the lower part of the pipe and intended for inspection and periodic cleaning of the chimney;
- brackets for fixing the structure in the mine or on the walls.
In addition, for the organization of installation work you will need such prefabricated pipelines and fasteners, such as bends, clamps and tees.
Types of chimneys and requirements for their installation
The flue gas outlet connected to the gas boiler can be laid both inside the residential building and according to its external structures, which makes it possible to classify all known structures of this class as internal and external.
For each of these types, standard specifications have been developed, which should be followed even in the case of non-standard execution of your chimney. The main requirements of these standards are as follows:
- With any scheme for connecting the chimney, its horizontal sections are laid with a slight bias towards the boiler (at least 3 degrees per linear meter).
- Connecting to this chimney other heating devices by combining several pipes is unacceptable. This can lead to overloading of the channel and the penetration of combustion products into the heated room.
- It is advisable to proceed to installation work only after a thorough study of all questions concerning the compliance of the chimney parameters with the characteristics of a gas boiler.
- When making calculations, one should proceed from the fact that the standard height of the chimney, as a rule, does not exceed 5 m. In the case of a flat roof construction, the upper part of the discharge channel should rise at least 1.5 meters above the roof.
- The height of the outer channel, some distance from the roof, is determined, as a rule, by the level of its ridge. At the same time, the chimney pipe, which rises above the ridge by more than 2 m, should additionally be fixed with the help of cable extensions.
The order of arrangement of external and internal structures has small differences, which will be discussed in more detail in the following sections (for example, steel chimney).
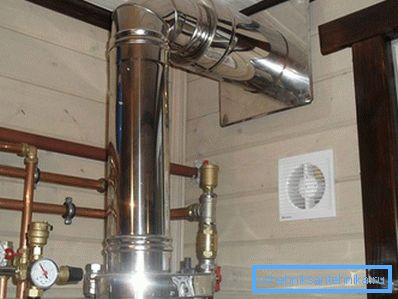
Installation of the internal discharge channel

The installation of the internal chimney begins with the marking of the route of its laying, during which the places of the passage of the smoke channel in the roof and the existing ceilings are outlined. Then prepared through holes for laying the channel, the dimensions of which must correspond to the dimensions of the inlet pipe.
Only after that it is allowed to proceed with the installation of the entire diverting system, the order of which can be represented as follows:
- First, a special transition adapter is connected to the branch pipe from the boiler, which ensures coordination of the dimensions of the outlet with the chimney.
- After that you can proceed to the assembly of the audit hatch with a tee. At the same time, brackets are mounted on the walls of the channel along its entire length, fixing the steel body of the channel in the chimney shaft.
- Then it will be possible to proceed to building up the pipe structure to the required dimensions, and if there are bends in the channel, to installing special adapters (elbows) in it.
- In the transitions through the overlap, a special pipe must be mounted, insulating the chimney from direct contact with the supporting structures.
- A galvanized steel sheet with a pre-prepared cutout is attached to the roof of the chimney on the roof, on a metal channel, and then fixed to the base of the roof with special fasteners.
Note that the joints of the individual links of the channel are necessarily reinforced with clamps, which after installation are tightened with special bolts or annealed wire. In addition, when installing the chimney, thermal insulation of the gasket sections in which its walls are in contact with easily combustible materials is mandatory (asbestos cloth is best suited for this purpose). In order to increase the reliability of thermal insulation in especially important places of the construction, the branch pipe is additionally coated with refractory mastic, after which a heater is laid around the perimeter of the opening.

Upon completion of the installation work, the entire structure is checked for leaks, during which the usual suds are applied to the seams of the structure, and then the boiler is turned on. In case of formation of soap bubbles in controlled places, the sealing is repeated.
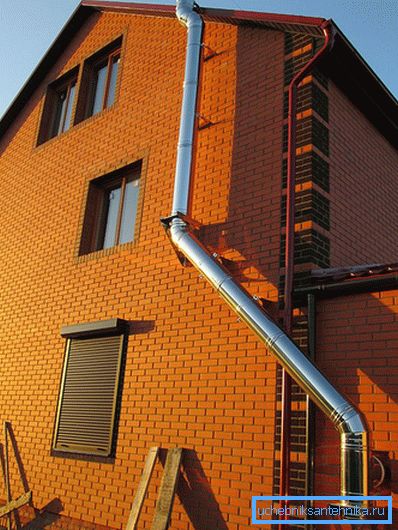
External chimney

Before laying the outer channel, the marking of the exit point of the chimney from the residential building is first carried out, after which the corresponding hole is prepared. Then a special feedthrough element is connected directly to the nozzle of the boiler itself, the end of which is brought out. (Advice on the need for careful sealing of the passage of the discharge element through the wall). After that, it will be possible to fix a tee with a plug on the outer terminal, the free removal of which will be used as a revision.
Immediately after this, it will be possible to proceed to building up the channel by adding new links to it. The formed joints are reinforced by the same clamps, then tightened with bolts or wire. Like an internal chimney, the external structure is mounted on the walls of the building with special brackets mounted every 2 meters.
As soon as the required chimney height is recruited - a special cone-shaped tip is installed at the end of the pipe, after which it will be possible to begin the insulation of the whole structure, which will exclude its freezing in the winter season. From the insulation of the chimney can only be abandoned if it is performed according to a special scheme, involving the use of special insulating elements that form the so-called "sandwich - channel". Upon completion of the installation work it is necessary to paint the structure with a heat-resistant coating that protects its surface from corrosion.

In conclusion, we note that all the installation operations described above are characteristic only for heating boilers in the floor version (except for parapet). Chimney channels for wall equipment, as a rule, are performed according to a two-circuit scheme.
Video
This video shows a hard gas boiler connection:
Look at why the gas boiler went out of sight, and how wrongly made chimney turned out to be to blame: