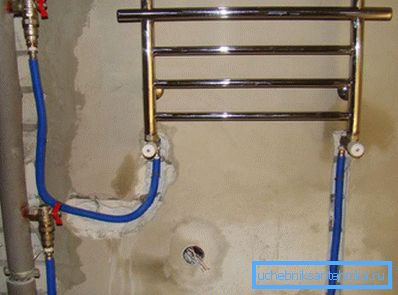
Connection of the heated towel rail with a pipe
There are several options for heating the bathroom. You can, for example, install a warm water floor. But if you have a centralized heating system, then this option will not work. Another way is to use a towel dryer.
Required material for work

To perform this demanding job you will need to prepare the following material:
- Heated towel rail.
- Connecting fittings.
- Shutoff valves.
- Pipe to connect to the riser
There are two methods for connecting a heated towel rail:
- In the heating system.
- In the hot water system.

As for the second option, there is a clear advantage, because you will always have hot water in a heated towel rail. However, it is not always used. Often the connection is made to the pipes of heating.
Tip! Connecting a heated towel rail to central heating is not necessary during the heating season. Do this work should be in the summer.

Often the heated towel rail has a zigzag appearance. If you wish, you can replace it with a more modern look. If the pipes are in the wall, then a side connection will be used for this. Although in appearance such a performance will be beautiful, the connection process is time consuming. Each connection must be perfectly sealed, otherwise leakage may occur.
Connection to the riser
Some work on their own. In fact, there is one connection scheme, following which no problems should arise. The sequence of work is as follows:
- Step 1. Dismantle the old towel rail.
- Step 2. Installing valves.
- Step 3. Laying the pipeline.
- Step 4. Installing a new heated towel rail.
- Step 5. Check the installation for leaks.
If you follow this simple scheme, the installation can be completed within two to three hours.

Before dismantling the old device you need to shut off the water supply. To do this, you must contact the utilities, but in some cases you can block the heating riser on your own.
Often at the joints the thread sticks to, so the pipes have to be cut with a grinder. It is important to make accurate calculations here so that the pipe section is enough to cut threads on it and then install a new fastener.
Installation of valves
After dismantling it is necessary to install cranes. If you cut the thread, then use a die to cut a new one.
Tip! Stop valves on a heated towel rail are necessary in order to control the operation of the device. If necessary, you can completely block the water.
Based on the type of connection, select the appropriate fittings. Each connection must be wrapped with fum-tape or tow. The thread must be sealed. Then you can connect the device to the fittings. It is important to be careful, as it is possible to accidentally damage the thread. For the connection is usually used American, which simplifies the connection several times.

Special attention should be paid to the distance between the wall and the pipe axis:
- If the pipe has O23 mm, then the distance should be 3.5 cm and more. If O50 mm, then the minimum distance is 5 cm.
- After connection, be sure to check each joint for leaks. To do this, fill the towel with water. If there are no leaks, the instrument is ready for use.
So, we have reviewed with you the main points that relate to connecting the heated towel rail to the pipe. There are no tricky rules here. The most important thing is to do the work in the right order. If you have any doubts or questions, please contact our experts.
Video
See how to install and connect the heated towel rail:
You might be interested in articles:
How to hide the heating pipe
How to decorate heating pipes