Heating water: features and installation of a resistive
If the design of the object is sufficiently thought out and there are no various economical options, then the heating of the water pipe is also foreseen in advance and does not need any modifications upon completion of construction. Such measures include laying the pipeline deeper than the ground freezing point by 50 cm, as well as its insulation with mineral wool, foam plastic or extruded polystyrene foam in basements or inside bearing walls.
But this, alas, is not always possible, therefore, in force majeure situations, you can use a resistive cable, as we will tell below, and also show the video in this article.

Warming
Resistive cable

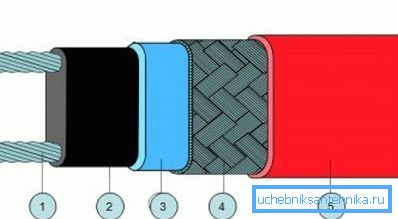
Self-regulating cable, which can be used to heat the water supply, is made in the form of a thick tape, where the polymer matrix is heated by parallel semiconductors.
Such a system is designed for self-preservation, that is, the semiconductors regulate their heating temperature independently, therefore, the burnout of this system is in principle impossible. In addition, such a wire can be cut in any place, if its length exceeds the required, but you can not make it twisted.
The modified polyolefin, which is applied in two layers on the heating cable, creates excellent mechanical protection against abrasion and impacts, chemical active substances (solvents, acetons, petroleum products), and also serves as an excellent dielectric.
If you want to purchase a resistive cable of this type, then do not forget that its price is much higher than that of PNSV, but you are completely relieved of control over temperature and voltage.
Installation and preliminary calculation

When choosing a resistive device, you will have to take into account three basic parameters for its installation:
- The diameter of the water pipe;
- The material from which the pipeline is made;
- The potential capacity of thermal insulation over the wire.
| Pipeline Diameter | ||||||||||||
| Indicators in mm | 15 | 20 | 25 | 32 | 40 | 50 | 65 | |||||
| Figures in inches | 1/2 | 3/4 | 1.0 | 1 1/4 | 1 1/2 | 2.0 | 2 1/2 | |||||
| Minimum thickness of surface insulation | ||||||||||||
| Indicators in mm | 20 | 20 | thirty | thirty | 40 | 50 | 65 | |||||
Table of ratios of the diameter of the pipe to the thickness of third-party insulation
Note. When heating a plumbing with a resistive wire, the installation manual also provides for additional thermal insulation with foam plastic, extruded polyethylene foam or mineral wool. Otherwise, half the energy will be wasted, that is, go into space.

- Installation of a resistive heating wire can be done in two ways - external and internal. External laying can be done in several ways - run the cable in a straight line on one side of the pipe, or two tapes on both sides, but you can also lay it in a wavy line and even wrap it around, but the latter option will cause a lot of trouble. Such surface mounting is mainly carried out in cases where the water supply or sewage system has already been assembled and put into operation.

- When you purchase a resistive heating cable for indoor installation, you should make sure that you sell the entire kit, which, in addition to the wire, includes a sleeve with a gland for sealing the input, as well as a cutting kit for connecting. Before you begin cleaning the ends, you should put a threaded sleeve on the wire, and then the gland itself, which should be tightly pressed against the polyolefin sheath (leakage protection).

- First of all, you will need to stretch the end of the shielded braid, and for this, clean the polyolefin sheath by about 30-40 mm and twist the screen in the form of a flagellum - you will need it for grounding. After that, remove the next layer of polyolefin by 15-20 mm in order to clean the heating ends, as shown in the top photo, just make sure that the ground does not have the opportunity to contact the heating matrix.
- Now you start cutting the matrix itself and for this it is best to turn the cable sideways and carefully, as if sharpening a pencil, remove the insulation first from one side and then from the other side. After that, dissolve the copper wires on the sides and cut the insulation from the middle. Do not try to do otherwise - the matrix is quite hard and it is best to remove it in this way.

- To connect the two pieces, you will need a two-channel adapter from the kit, the recesses of which you pre-fill with sealant, which also comes with the equipment. At the ends of the wire are also put on first plastic, and then metal tubes, which are flattened with pliers in the form of terminals, which are inserted into a shield or a special box, as in the upper image. After that, put the cable inside the pipeline through the tee and tighten the sealing sleeve that you put on at the very beginning.
Recommendation. When you choose a resistive wire for heating water pipes, then you should pay attention to the certification of insulation - it should be suitable for the use of food. If there is no such certificate, then the wire can only be used for installation in the sewer system.
Conclusion
After installation, you need to seal the end of the cable with your own hands and to do this, divide it, as well as for the connection. Only in this case you need to make the ends of different lengths, that is, cut one above the other 5 mm further along with the die and fill with sealant.