How to install siphon yourself
Installing a siphon is such an easy operation that it is not worth rushing to invite a qualified plumber for this. The modern design of siphons is quite simple, which allows you to do all the work yourself. From the tool you only need a screwdriver. In some cases, there is a need for other tools. So do not be alarmed by the dull look of the old siphon and complex plumbing terms. Before you learn how to install a siphon yourself, we suggest that you familiarize yourself with its design.
Principle of operation
A siphon is the connecting between the sewage sink (sink, sink, bathtub, etc.) and sewage. Thanks to the siphon, the waste water is discharged, waste that is unacceptable for sewage is retained. Siphon also protects the apartment from gas, noise and insects from the sewer. Promotes the last so-called hydraulic valve.
Tip! If you look under the sink, you can see a curving hose or knee. In this bend (or knee) there is always water that closes unpleasant odors. When you open the tap, the water is pushed out of the closure into the common-house sewage system. In the shutter itself remains somewhere with 0.5 liters of fluid.
Kinds

Siphons are divided according to three criteria: the type of sewage receiver, the shape of the gate and the materials of manufacture.
By type of sewage receiver, the devices are divided into siphons:
- for sink (as on the kitchen, so in the bathroom);
- for Bath;
- for a shower cabin (so-called ladders);
- for washing machine;
- for the dishwasher;
- for toilet bowl;
- for the urinal;
- for bidet.
The shape of the seal part siphons share:
- on tubular (or knee);
- on the bottle.
According to the materials of manufacture siphons share:
- on plastic;
- on metal.
Tip! The most popular material is plastic. Metal justifies itself only for aesthetic reasons. In all other respects, including in price, he loses plastic.
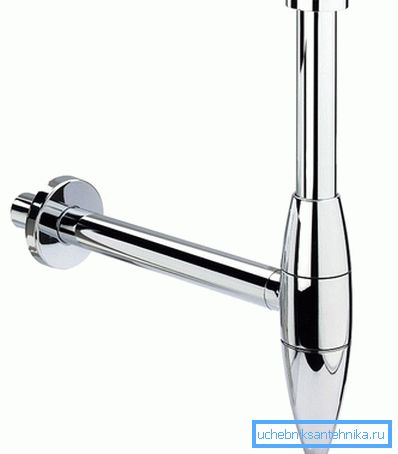
Among the plastic siphons for sinks in the market leading bottle. He really looks like a vertically set pot-bellied bottle. This siphon closes the neck with a stopper through which the tube is held. The tube goes deep, but not to the very bottom. Somewhere below the clogged neck there is a hole. In the interval from the bottom to this hole (including the tube cavity) there is always water protecting residents from odors from the sewers. In essence, it turns out the same bend as an ordinary tubular siphon. Only the bottle has a removable bottom. It accumulates heavy particles of waste that is easy to remove when unscrewing the cork. On the example of a bottle device for the sink below, step-by-step instructions will be given on how to properly install the siphon.

Tip! Siphons for different wastewater receivers are fundamentally no different, but have a different shape. This is due to the features of the places in which the devices are mounted.
To the sewer pipes from the drain hole of the sink, the distance is greater than from the drain hole of the bath and therefore all the details to a vertical location. For this reason, you are unlikely to encounter a bottle-type siphon for a bath or shower.

As for the bath, then it necessarily requires an additional outlet for the overflow. The overflow function can also occur at sinks and at some other receivers.
Separate siphons for a dishwasher or washing machine are, but in practice, hoses from such equipment are most often connected to siphons under a sink or bathtub. In this case, the latter must have additional entrances below the drain hole and before the hydraulic seal - the so-called unions.
Installing the sink siphon

Before proceeding with the installation of the siphon, it is necessary to become familiar with the accessories that are included in the kit. Knowing their purpose, you will be easier to cope with the task.
Legend
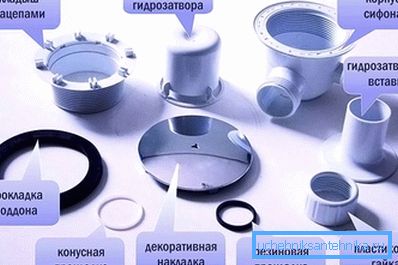
In the plumbing vocabulary there are a lot of words, after reading for the first time, you will not immediately understand what it is about and how it looks. And despite this, it’s quite realistic to figure out how to install a siphon. We invite you to familiarize yourself with the list of symbols:
- Nozzle - a short piece of rigid pipe. It can be straight, loop, swivel, threaded at one or both ends, or a socket for connection to other connections. In a word, the branch pipe is an elementary unit of rigid sanitary communications.
- Spout - extension at the end of the pipe (pipe) to connect it to another pipe (pipe). A wide rubber seal ring is inserted inside this extension, and then the end of the attached pipe (pipe).
- The drain is not the hole in the sink or bath itself, but already the part of the siphon that is directly attached to it. The drain consists of a protective grille, a long fixing screw, a drain pipe, in the center of which there is a threaded cavity, two rubber gaskets, corrugations for eliminating drains and more.
- Intermediate nipple - the part connecting the drain nipple and the siphon tank. Depending on the siphon model, additional narrow branch pipes - fittings may depart from the intermediate pipe. Sometimes the role of an intermediate pipe is played by an elongated drain pipe - it all depends on the specific model.
- The siphon tank, also known as the bottle, it is the water seal - the main part of the siphon contains water all the time. The bottle is disassembled into two parts: a rounded bottom with high sides and a dome with a discharge pipe on the side and an inlet pipe inside (in part it looks out from under the dome).
- Corrugated - corrugated hose. Often used to connect the siphon to the sewer pipe.
- Cuffs - tubular adapters for pipes, tubes and hoses. They are needed when the diameters of the connected parts of the structure do not match.
Installation instructions bottle siphon
- Arm yourself with rubber gloves, place a bucket under the sink, and dismantle the old siphon.
- Clean the entrance to the sewer pipe and temporarily cover it with a rag, so you will protect your respiratory system from sewage gases.
- Place a rubber gasket on the sink drain (all gaskets must be in the kit).
- Insert it into the hole with the protective grid laid on it and bait the mounting screw.
- From below, press the sealant to the drain hole (it can also be called a rubber gasket with a width of 3 to 5 mm) and prop it up with the socket of the drain fitting.
- With your free hand, start screwing in the mounting screw. If the drain pipe does not roll when the bolt is tightened, then this is good. In this case, you can lift up and tighten the mounting screw with a screwdriver, as follows.
- Slide the gasket onto the intermediate nipple and attach it to the drain nipple using a coupling nut (all coupling nuts must be in the kit).
- Attach a gasket to the opening of the inlet pipe at the top of the dome of the siphon tank and fasten the structure with an intermediate pipe using a coupling nut.
- Also, use a gasket and coupling nut to connect the siphon discharge pipe to the corrugation (it may not be included in the siphon kit).
- If the diameter of the discharge pipe of the siphon does not coincide with the diameter of the corrugations, then buy a cuff. Before fastening the branch pipe to the corrugation through the cuff, remove the gasket from the branch pipe - it is not needed with the cuff.
- Insert a rubber seal into the socket of the sewer pipe (it may not be included in the siphon kit), and then direct the free end of the flutes to the same place.
This completes the installation of the siphon. Turn on the water, put a newspaper under the siphon and turn off the water in a minute. Newspaper dry? If yes, then you have succeeded. If not, check all nuts and gaskets. This will not help either, then disassemble the siphon in the problem area and assemble it by applying silicone sealant on the rubber gasket and thread.
Maybe you will be interested in additional materials from our site:
- How to clean the clogging on your own
- How to install a ladder for the soul
- How to make a sewer
- How to connect a heated towel rail with a pipe
Video
You can learn about the nuances of siphon assembly from the video offered by us: