How to change the gasket in the mixer
If the faucet starts to flow in the bathroom, you may need to check that the gasket is in order. In the event that it is damaged, it may require replacement.
How can I visually determine the condition of the gasket? Most often, it can be pressed in one or several places, ceased to be elastic, or the whole collapsed. However, to understand exactly what state the gasket is in, you can only disassemble the valve.
Preparatory process

The very first thing to do is to shut off the water. Even before disassembly, you need to prepare a set of fitting tools that will be needed in order to change the gasket.
Experienced locksmiths recommend that before disassembling the mixer you close the stopper with a drain plug in the sink or bath, as small parts can get into it. From the sewer they will be difficult to get, but even impossible. It is also necessary to remove all nearby objects, so that they do not interfere and fall on the floor.
What tool might be needed? First of all it is:
- adjustable wrench;
- pliers;
- Phillips and slotted screwdrivers;
- durable and sharpened knife.
Tip! In rare cases, a gasket flows between the mixer and the water pipe. Sometimes it is enough to tighten the nut to eliminate leakage. Otherwise, disassemble the mixer.
Types of faucets
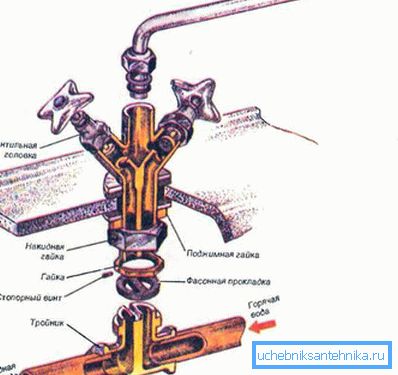
Crane with reciprocating rod
After the main valve is shut off and the water is drained from the system, the mixer can be disassembled. It using a screwdriver unscrews the bolt that secures the mixer valves. The bolts are removed, and after the wrench, the base of the valve on which the gasket is located is unscrewed. It would not hurt at the same time to look at the core itself, in which state it is. It is better to replace it immediately, if visually something is in doubt.
Remove the damaged gasket should be as follows: it hooked with a slotted screwdriver, when the gasket is removed, the surface under it must be cleaned of accumulated debris (if any), using a slightly heated vinegar.
Then to the place of the damaged laying establish new. It is important that its dimensions are the same as in the past. If the size is larger, the edges will go on the walls of the mixer and the water cannot be completely blocked, and if the size is insufficient, water will leak into the gap.
On the pin, the gasket must be tightened with force.
It is also important which sealant is used for hot and cold water. A rubber seal is best suited for a cold water valve, and leather is usually used for hot water. Considering that in certain models the gasket is fixed directly to the rod, it may be necessary to replace the entire core, and not just the seal.
The mixer is assembled in the reverse order, that is, the core is fixed on the valve first. Using a key, it must be tightened, without making too much effort, otherwise the gasket will deteriorate. A cap is placed on the assembled valve, after which the mixer is checked for leaks.
Handwheel Mixer
This tap has its differences. So, its head and casing are solid parts. Therefore, before disassembling the inside of the mixer with the flywheel, it is necessary to remove the protective cover from it in order to get to the nut that holds the valve.
During fastening of the casing on the base, you need to unscrew the screw that holds it, after removing the cap.
The same wrench or adjustable wrench unscrews the fastening nut and takes the neck. There is a gasket that should be replaced. Most often, it is pressed with the internal pin to the base, but can be located freely. Regardless of this, you need to pry it gently so that nothing is left of it inside and pull it out and put a whole in its place. The mixer is then assembled, the central valve opens to supply water and the mixer is checked.
Tip! For a better check, you must separately open the faucet with hot water, cold, and then both faucets.
What mistakes should be avoided

Quite often, during the repair of the mixer, a number of serious and not very mistakes are allowed. If they are avoided by doing everything correctly, then the service life of the mixer will be long.
One of the most common mistakes is the extremely tight tightening of valves or cores. So the gasket can be sold, because of what it will last only a few months or even weeks. As a result, all repairs will be done in vain, and soon the mixer will need to be disassembled again.
Others, when unscrewing the core and its screws, may inadvertently handle tools, damage the coating of the mixer. Tip one - more care and accuracy. Well, the most annoying thing is when during repair the water from the disassembled mixer starts to flow, splashing the walls, the ceiling and the floor. The simplest thing is to check the main valve several times before disassembling the mixer.
It is worth paying attention to this. In some cases, the cause of the leakage of a crane may not be a gasket at all. Or not only a seal, but also something else. Therefore, if after installation of the mixer in place, water continues to leak from it, you should check the following:
- Is the gasket installed correctly?
- whether internal elements of the mixer.
When you are completely convinced that the crane after repair is in good condition, you can fold the tools and clean the garbage. The mixer is fully usable, you can safely open the water.
Mixer Prevention

It is easier to keep the crane in proper condition than to repair it. To do this, all family members (or, if this is an enterprise, all employees) must properly handle the mixer, that is, do not pinch the valve on it. In no case should water get inside the tap, otherwise some parts inside can rust. If corrosion has appeared on the metal, then it must be cleaned and painted. After operation it will be useful to wipe the tap from water and condensate collected on it.
Since after repair water will be supplied through the mixer, it is necessary to take care that it goes through the sewage system, and does not flow to the floor. Therefore, we suggest that you familiarize yourself with the following articles:
- How to connect a sink.
- How to connect the bath to the sewer.
- How to change the hose on the mixer.
Video
This video tells you what to do when a faucet drips: