How to install the tank on the toilet
The toilet is an integral part of every modern dwelling. However, the toilet bowl will function well and fulfill its main purpose only if all its parts are correctly mounted. At first glance, self-installation may seem complicated, but in practice, installation is quite capable of everyone.
The main parameters of the selection of drainage equipment
The main criterion for the selection of the cistern is its design. Most often, tanks are sold complete with a toilet, so you need to pay attention to the whole set and choose the appropriate size.
There are two methods of draining:
- Upper with non-floating valve. The drain mechanism is a plastic cylindrical valve. At the moment of draining it rises, and then falls. The draining process is carried out manually.
- Side with float valve. Such a system is equipped with a chain, drain lever and hydraulic lock. All this is part of the float valve. In the process of draining the water valve rises. At the right time, the water supply stops under the influence of a hydraulic seal.
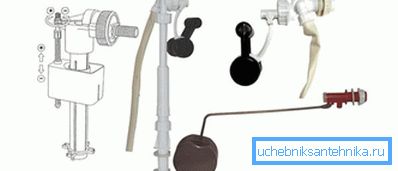
For stable operation use specialized mechanisms, for example, fittings for the cistern and toilet bowl. As for the fittings of the drain tank, then it includes equipment that regulates the flow of water. A toilet bowl fitting serves as a dispenser. Thus, it regulates the volume of discharge water. This avoids overflowing water. In the working condition of the valve is mechanically.
If we compare the old models with modern ones, we can find one characteristic feature. Outdated models of tanks are fixed directly with the help of fittings. It is equipped with a special rod float. The principle of its operation is based on a back pressure system. As for modern designs, they have a slightly different configuration.
Types of tanks and technological features of their installation
There are several types of tanks, which differ in technical characteristics and installation method:
- Separate tank from the toilet.
- Tank on the shelf.
- Built in.
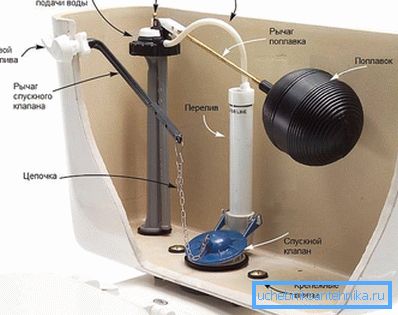
The standard tank will have the following components:
- Drain fittings.
- Stub. It is necessary only in cases where the lead pipe is performed from the side of the tank. Its installation is carried out on the opposite side of the fill fittings.
- Mechanisms and devices that perform the role of filling the tank with water and adjusting the amount of water in it. These include the following items: ball valve, float valve, inlet fittings and inlet valve.
- Button. It is installed on the tank cover itself. In some cases, it directly connects to the water release mechanism. To disconnect it, you need to turn it counterclockwise.
Installation of a freestanding flush tank
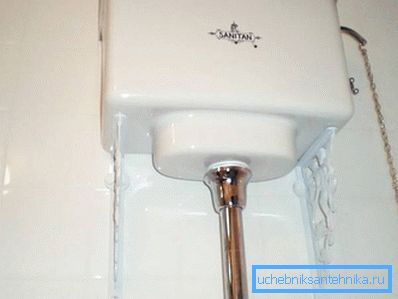
The first thing on the wall mark the height at which the tank will be installed. This height must be at the required level in relation to the opposite lower end of the pipe. As for the pipe, the standard is O32 mm. The pipe is fed to the tank. After that, with the help of an electric drill or perforator, mounting holes are drilled. Installation is carried out using dowels. For example, some models have special brackets, they are included. If they are not, then you should buy them separately.

Pre-installed drain fittings in the tank. When all work is done, the entire mechanism should be checked for leaks.
Installing the tank on the shelf
In this case, the tank is mounted directly on the toilet itself on a special shelf. To do this, first of all, a rubber cuff is applied to the drain hole of the toilet bowl. Cuffs should be of good quality, because the duration of the work of this item will depend on it. If the cuff material is extremely fragile or of poor quality, then after a short time the water will seep onto the floor.
Tip! The gasket between the toilet and the tank should be made of elastic soft rubber-like material. When purchasing, make sure that the cuff has the correct shape. It is round and oval.
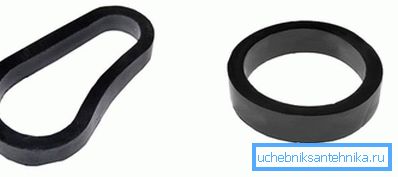
As for the surface of the shelf, it should be perfect and not have the following design flaws: shells, nodules, cracks and chips. After installation, the sealing cuff should fit snugly to the bottom hole on the shelf and its upper part to the bottom of the tank itself.
Tip! In order to prevent water leakage at the installation site of the sealing cuff, it is recommended to apply a thin layer of sealant, for example, silicone. Moreover, it will prevent the cuff from moving during assembly.
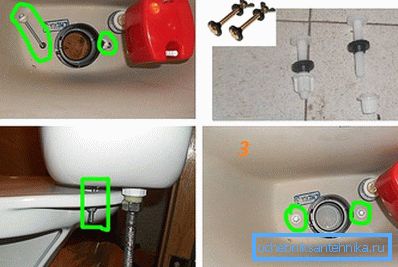
After that it is important to pay attention to the holes inside the cistern. They must fully coincide with the holes that are on the shelf of the toilet. They fasten the mounting bolts, which on both sides must have a gasket. Use the nut wrench to carefully tighten the nuts. In the process of mounting the bolts do not forget to put the gaskets on the bolts on both sides. Their absence can lead to a split of the toilet bowl or cistern, respectively, the integrity of the structure is broken.

Once you have mastered this process, you only need to install the cover and also connect the water supply hose.

Tip! The hose that will supply water must be provided with a rubber gasket. If it is missing, the connection will be leaky.

Pre-track the level of water that enters the tank. If necessary, adjust it so that water does not overflow.
Installation of a built-in tank
In recent years, built-in tanks have become the most popular. They are made of high quality polymeric materials. They look like a large flat canister. They are fixed on a special metal frame on a draft wall. A hanging toilet bowl is additionally mounted on this frame. In this case, the whole mechanism, including the cistern and the toilet, is sold in the kit, so you will not have to buy any additional parts separately.

This design is significantly different not only in installation, but also in price.
Installation of this type of tank is carried out strictly according to the manufacturer’s instructions. Despite the large range of such structures, there is a general principle of their installation. We divide the entire installation process into several stages, which should be carried out sequentially:
- The main requirement for the installation of the frame, respect for the exact vertical. You can check with the help of construction level. It is in a vertical position that the structure functions best.
- The frame itself is fixed with dowels to the wall and to the floor. There is an option when the built-in tank is mounted in the wall without a metal frame. In this case, the frame is made of blocks or bricks, but it is time-consuming work.
- Water and sewage pipes are pre-supplied.
- If your chosen model has the function of dispensing water, then this mechanism is built next to the whole structure.
- To avoid condensation, the tank can be insulated. For this you can use polystyrene foam.
- After installation of all parts of the mechanism, as well as the necessary communications, the body is closed with a gypsum plasterboard. At the same time, two bolts should be peeking out of the wall, for connecting a wall-hung toilet and two openings for draining water from the toilet and for draining water from the tank.
- At the time of connecting the toilet, it is important to ensure that each connection is tight.
- After installation, a leak test is performed.

It is worth noting that the drain button will have two keys. They regulate the amount of water release. So, the first will lower six liters of water, and the second nine. Built-in tanks help save water consumption.
Choice of fasteners
In most cases, all attachments for the tank are included. However, there are cases when there is a need to replace them. One of the main reasons for the need to replace fasteners - the effects of corrosion. In the area of the cap, the bolt can quickly rust under the influence of moisture. Because of this, it is in this place that a leak may occur. The best option would be a stainless steel bolt. Best of all, if the thread on the rod is made only at the end, this kit will be the most successful. It is worth paying attention to the kits, which are made of brass and high-strength plastic. High-strength plastic kits consist of a bolt, nut and rubber gasket. It is best if the bolt head is tapered. This increases the tightness of the mounting hole.
Tip! It is impossible to combine two sets into one. For example, use a plastic nut with a stainless bolt.
As for metal fasteners, there is a large selection. Stainless steel and non-ferrous alloys are not magnetised. It is on this basis that one can choose a high-quality fastening set for a flush tank.

If during the work you are faced with a problem, then ask your questions to our experts.