How does the internal sewage do it yourself in a private
Each owner is trying to arrange their home as comfortable as possible. But to talk about the full comfort of housing, if there is no sewage system, is not necessary. Therefore, the device of this system is an extremely important point that needs special attention.
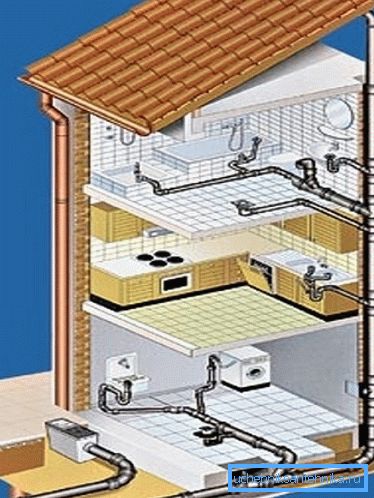
In this article we will take a closer look at how an internal sewage system is performed in a private house.
General information
First of all it should be said that all the work on the organization of the sewage in the house comes down to the following work:
- Sewerage equipment - it includes everything that is located outside the house. This pipeline and septic tank or cesspool. In the case of a centralized sewage system, the work is greatly simplified.
- Construction of domestic sewage - these works include the installation of the riser, the funnel pipe and the wiring to the bathrooms. First of all, you should deal with the arrangement of the internal system.
Of course, for the construction of the system, you can seek help from specialists, however, if you do this work yourself, you can save a lot of money. There is nothing super-complicated in this; the only thing is that it is necessary to strictly adhere to certain rules and requirements that apply to such installation work.
The scheme of the sewer system should correspond to the layout of the house. True, even when planning it, it is desirable to compactly arrange the premises to which water will be supplied and wastewater will be discharged.
Such premises include:
- Kitchens;
- Bathrooms;
- Bathrooms;
- Laundries, etc.
The compact arrangement of these rooms will simplify the installation of the system. The best layout option is when all plumbing fixtures can be tied to one collector, through which the outflow of effluent into the septic tank, cesspool or central sewage will be carried out.
In the case when the house is large and it has several rooms with water supply and drainage located in different parts of the building, experts recommend using a sewer system with several septic tanks or cesspools. In addition, if the house has two or more floors, it is necessary to install risers.
Domestic sewage
Pipeline diameters
For each house requires an individual scheme of sewage. However, there are some common standards. First of all, they concern pipes:
| Drainage in the toilet | The diameter of the pipes must be at least 100-110 mm |
| Drainage from the kitchen and bathroom | PVC or PP pipes with a diameter of 50 mm are used. |
| Turns | Performed at an angle of no more than 45 degrees, which minimizes the possibility of clogging of the system |
Tip! It is most expedient to use polyvinyl chloride pipes for arranging sewage systems, since they are low in price, they are durable and more reliable than cast-iron ones. In addition, to mount such a pipeline is much easier.
Scheme of sewer system
Starting the arrangement of sewage with your own hands should be with the determination of the location of the riser or collector. Then from the riser is carried out further wiring diagram. However, you should first familiarize yourself with the features of sewer schemes.
In the future, according to the prepared scheme, it is possible to perform the calculation of materials and plumbing equipment, which is necessarily required for the construction of sewage systems.
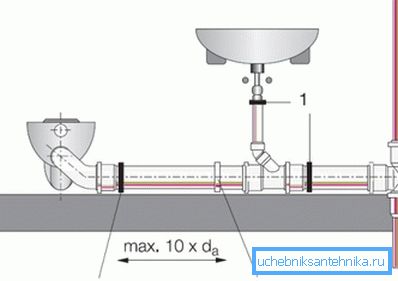
The scheme can be performed on a regular piece of notebook in a cell or graph paper. You will need a ruler, a tape measure and a pencil.
The scheme of domestic sewage in a private house is performed in the following order:
- First of all, you need to make a plan of the house in scale. If the dimensions of the house are unknown, you will first have to go over it with a tape measure and take measurements.
- Next you need, as mentioned above, to determine the location of the risers.
- After that, on the prepared plan it is necessary to indicate the points of location of sanitary devices and the methods of their connection.
- Next, it should be noted the location of the pipes that will connect the riser with plumbing fixtures. The diagram also indicates all connecting elements, which include bends, tees and other pipeline parts.
- All the above steps must be performed for each floor.
- At the end of the work you need to calculate the total length of the sewer pipe.
- When performing the internal scheme, you can immediately perform the external one, to which the pipeline goes, from the outlet to the deep cleaning station or cesspool. It is necessary to take into account all the norms of existing building codes.
The process of the execution of the scheme is completed.
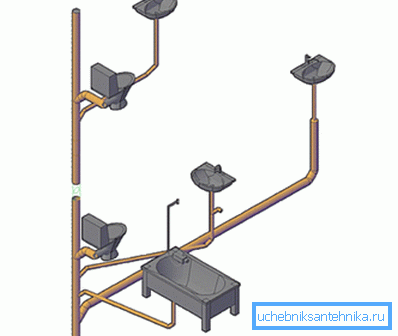
Installation
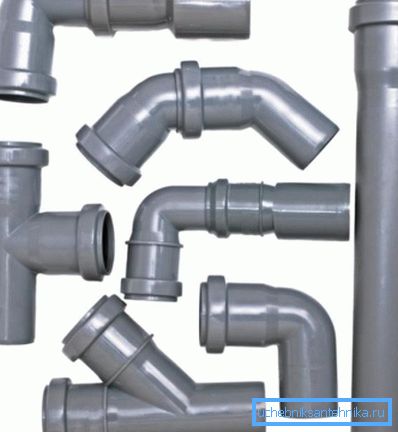
Perhaps the greatest complexity of the device in-house sewage is at the stage of distributing and laying pipes. As mentioned above, the easiest option is to use PVC or PP pipe for sewage. Recently, there is a large range of these products, so it will not be difficult to choose knees, tees and other parts for pipes.

Tip! If you decide to carry out the work yourself, you should call someone to help, because the process alone will take much longer, and it will also affect the quality of the installation.
The installation instructions for the system are as follows:
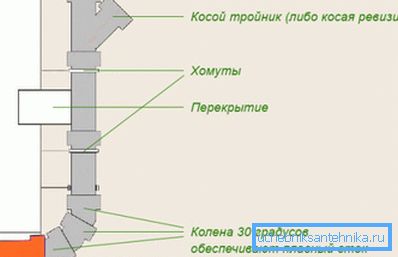
- Begin work with the assembly of the riser. It is best to install a stand in the toilet, since the size of the pipe that will connect the toilet to the stand is 100 mm. For durability and reliability, the riser can be attached to the wall with mounting clips, however, often in the wall make special channels or have a riser in the box.
- Pipeline joints should be coated with special sanitary sealant. To connect pipes with a riser, you must use oblique tees. All joints should be further processed with special sanitary sealant.
- In places where the pipes pass through the wall or ceiling, experts recommend using a sleeve.
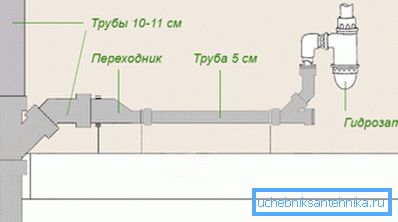
- In the joints of pipes of different diameter, special adapters should be used.
- At the intersection of pipes from the sink, shower and bath, you must use a collector pipe with a diameter of at least 100-110 mm.
- When connecting plumbing fixtures to the sewage system, it is necessary to perform water traps that prevent unpleasant odors from entering the room.
Note! On each riser, you need to install a special tee, which will allow, if necessary, to perform clogging. To avoid any problems with cleaning the sewage system in the future, the tee should be installed after each turn of the system.
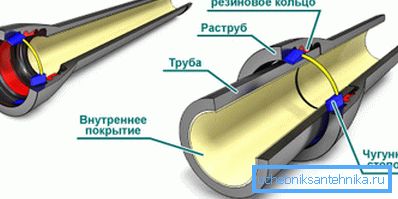
When installing the system, be aware of the slope of the pipeline. In a free-flow system, the angle of inclination, in accordance with SNiP, depends on its diameter:
| Diameter 50 mm | The slope must be at least three centimeters per meter |
| Diameter 110 mm | The slope must be at least two centimeters per meter |
To ensure the necessary slope, different points of the pipeline should be placed at different heights.
Tip! When installing pipes, it is necessary to check the tightness of the system, filling it with clean water. Only after such a check is the full use of the in-house sewage system allowed.
Installation release
When installing the system, experts recommend starting work with the release, which will prevent the inconsistency of the internal and external sewage systems. The release is called the boundary part of the system that connects the internal sewage to the external.
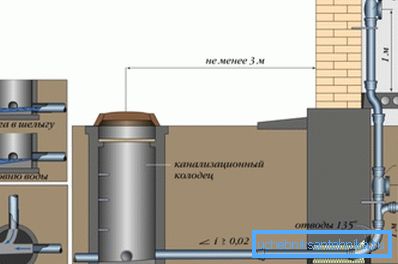
Release should be installed at a depth below the freezing ground. Accordingly, the exhaust pipe should go through the foundation. For different regions, the depth of soil freezing may be different.
If for some reason it is not possible to locate the pipe at such a depth, you can install it even higher, but in this case it must be well insulated so that it does not freeze during the winter season. If you do not, then you can use the sewage system only in the spring, when the system thaws.
If during the construction of the house the builders did not bother about the hole for the outlet pipe, you will have to pierce it yourself. For these purposes, apply the method of diamond drilling.
Note! The diameter of the exhaust pipe must be not less than the diameter of the riser.
After the hole is made, a pipe is put into it with the sleeve attached, i.e. another pipe of larger diameter. On each side of the foundation, the sleeve must protrude 15 cm or more.

Installation of the fun pipe
In order for the house sewage system to work as expected, it is necessary to install a sewer pipe.
It is needed for the following reasons:
- Equalizes the atmospheric pressure inside the system, which helps to prevent air exhaustion and hydraulic shocks.
- Increases the durability of the sewer system.
- Provides effective work septic tank.
The funnel is, in fact, a continuation of the riser, which is displayed outside the roof. I must say that some craftsmen combine a fan pipe with a chimney. However, experts do not recommend this.
Conclusion
Installation of domestic sewage in the house is not as difficult operation as it may seem at first glance. The only thing that is extremely important in strictness is to follow all the rules and requirements given above. Otherwise, it may be necessary to rework the system, which is more complicated work than installing it from scratch (see also the article Pipes for domestic sewage: selection and application).
From the video in this article, you can get more information on this topic.