How to install a plastic toilet bowl
The toilet bowl is an integral element of the sewer system. It accumulates water from the water supply network, and then under pressure flows into the bowl of sanitary equipment. It can be made of different materials - metal, ceramics, plastic, and we will be talking about the latest version today. Most often, these models are designed for floor toilets and fix them at a certain height above the bowl.

Device Overview
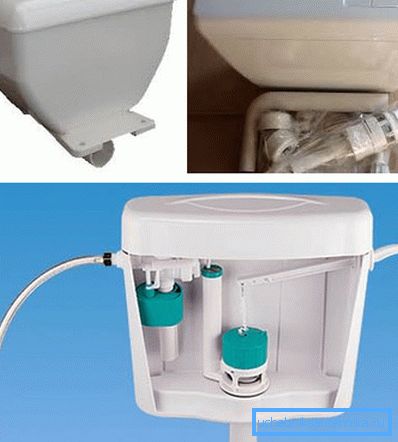
- Plastic toilet cistern for the floor type of the usual type comes with a cuff.
- It is considered universal and suitable for any sanitary equipment.
- Meets modern requirements for flush-mounted or compact flush tanks. The price of the device is lower than similar models from other materials.
- Therefore, it is easy to install on any type of toilet bowl:
- with the platform - installation is made the hands directly on a toilet bowl;
- a bowl “Genoa” or a toilet without a platform - the product is installed directly on the wall.

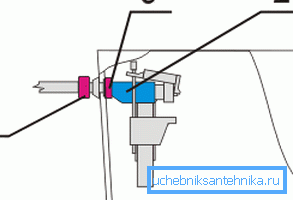
- Suitable for any type of water supply. The inlet foot valve is supplied complete and can be mounted on the right or left.
- Allows you to save water, because at any time you can stop the drain. To do this, simply click on the other side of the button.
- The plastic toilet cistern is easy to use, does not break, has a modern design, occupies a small area in the bathroom.
Meet the old type of construction with the upper descent can be in houses built in the 60s of the 20th century. Over time, they began to be replaced by compacts.
How to properly install and operate a universal wash tank
The design makes it possible to mount it on different types of toilet bowls. It is very convenient that you can simply attach it to the surface of the wall, regardless of the type of sanitary equipment without a platform and for the Genoa bowl.
Water can be supplied from different positions:
- left;
- on right;
- bottom with 2 sides.
To do this, use flexible liner and bottom valve.
Tip: the use of a bottom valve makes it possible to hide the water supply to the tank.
- The capacity can hold about 9 liters, standard dimensions - 360x400x130 mm, but they may vary depending on the manufacturer.
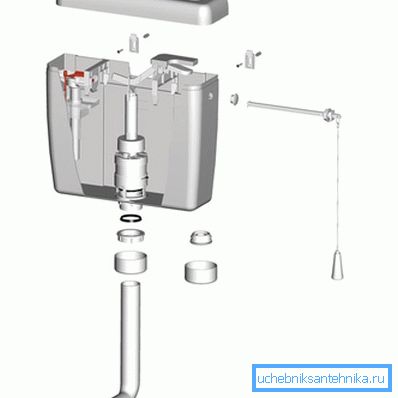
- The installation kit on the toilet includes:
- container assembly with fittings;
- fasteners;
- instructions for installation and operation.
- The kit for the mid tank is as follows:
- plastic container assembly with fittings;
- bracket with dowels for fastening to the wall;
- lowering elbow (usually 650 mm long);
- decorative nut;
- 2 cuff;
- installation and operation manual.
The service life of the device with proper operation is unlimited. Usually manufacturers give 3 years.

Water supply method
To select on the tank there are 4th places, which are marked accordingly.
| Below |
|
| On the side | When the bottom valve for some reason does not suit, you can install the side left or right. Water can also be brought in with a flexible hose. Places that need to be cut with a knife are marked in the tank. Note that it is not always possible that the side flap may be included in the kit and must be purchased separately. |

How to install a tank
Below are two ways:
- On the toilet - in the cistern, 6 bastions were made, which correspond to the existing models of toilet bowls. Holes must be drilled independently with a drill with an O6-8 mm drill. Capacity is fixed on the toilet with mounting bolts according to the valve instructions.
- On the surface of the wall - for this provided brackets and dowels. The fastener is designed for a total load of more than 50 kg, so it is able to securely hold the capacity. Marking should be done on the downpipe, which can be cut to the required size.

Process:
- Retreat from the wall at a distance of 150-200 mm, if the toilet is installed for the first time.
- Assemble the tank together with the fittings, adjust the float, securing it between the 2nd and 3rd teeth of the valve thrust.
- Insert the button lever into the valve rod.
Tip: it should have a small gap.
When you click on its opposite side at any time you can stop flushing the water, which makes it possible to save water.
- Insert one of the cuffs into the saddle, fasten the drain pipe in it, for which you put a decorative nut on it.
- Suspend the cistern, and insert the other end of the pipe with the installed cuff into the toilet.
Usually, the installation of a universal tank takes about 30-60 minutes.
Conclusion
Without a flush cushion you cannot fully enjoy the comfort of using the toilet. In our example, we looked at a universal plastic container that can be mounted directly on a shelf of a sanitary equipment or attached to the surface of a wall above it.
In the second case, a special drain pipe is provided. Installation of the tank is not difficult, so it can be easily installed independently in accordance with the instructions. The video in this article will provide an opportunity to find additional information on the above topic.