How to organize the water supply from the well to the house
In a country house, the usual centralized water supply is most often unavailable, so the water supply from the well is a necessary measure. Compared to connecting to a centralized conduit, this method of providing drinking water at home is somewhat more complicated, but the effort expended is worth it.
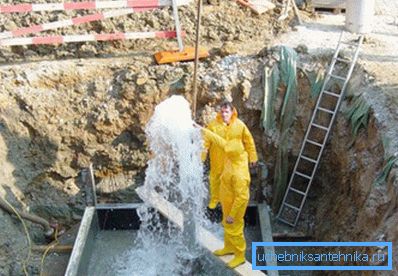
Comparing water sources for home
In general, in addition to the well, you can select a couple of water sources for the house, we are talking about wells and centralized water supply.
As for the variant with central water supply, it differs in that:
- does not require significant investments to connect, most of the work can be done by hand;
- on the other hand, the quality of water leaves much to be desired, besides, the consumer is dependent on the pressure in the main;
- in country houses this option is completely unavailable, so you have to look for an alternative.
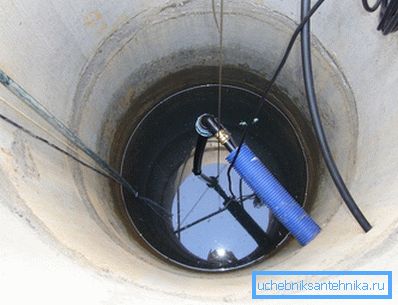
The well can already be considered as an inexpensive option of autonomous water supply at home.
Its features include:
- low cost;
- water may be contaminated by falling leaves, branches, so you will need a lid;
- the water intake should be regular, otherwise the water may bloom, it is clear that it is then unsuitable for drinking;
- There is no guarantee that a well can even be arranged on the site. Perhaps at a shallow depth there is no groundwater at all, or the groundwater will not allow enjoying well water.
Note! Wells as a source of water are distinguished by the fact that even in the absence of electricity, you can still get water - you just need to lower the bucket, fill it and pull it out. This number will not work with a well.
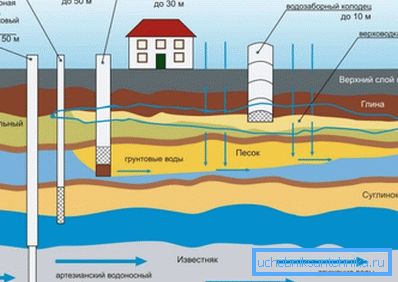
As for wells, they can be divided into 2 types (depending on the depth):
- well on the sand, as a rule, it has a depth in the range of 20–30 m (in some cases, the depth may increase) and is capable of supplying clean water to the house for about 10 years. At the same time, special attention should be paid to the filtration of water, because of the sandy soil there is a high probability of its penetration into the pump, which can damage it;
- artesian well it can reach in depth and can reach more than 100 m. It can be considered an ideal option unless the budget is a weak link.
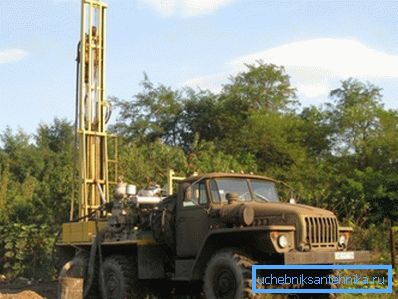
If all the necessary communications have been made and it is necessary to choose what will be used - a centralized water supply system or a well in a private house, then only the cost of the well devices does not speak in its favor. For the rest of the indicators, such water is superior to tap water - the fact is that the well reaches the artesian aquifer, the water is comparable in purity to the purchased bottled water.
The organization of water supply from the well to the house
The scheme of such a water supply is somewhat more complicated than, for example, with a simple inset into the central water main. In particular, it is necessary to provide a caisson device so that the well can be serviced, pick up a suitable pump, filters, correctly place it in the well, etc. In the house the pipe routing is no different.
What is needed for the organization of water supply at home from the well
In addition to the pipes themselves, various shut-off / control valves, various fittings, etc. You will also need a number of specific elements:
- caisson - its device will be discussed below, briefly it can be described as a small chamber for servicing a well and equipment;
- submersible pump;
- filters - provide water purification and protect the pump from premature failure;
- automatic equipment so that the pressure in the system does not change irregularly;
- hydroaccumulator - is used to ensure that the pump is less turned on / off, allows you to stock a certain amount of water.
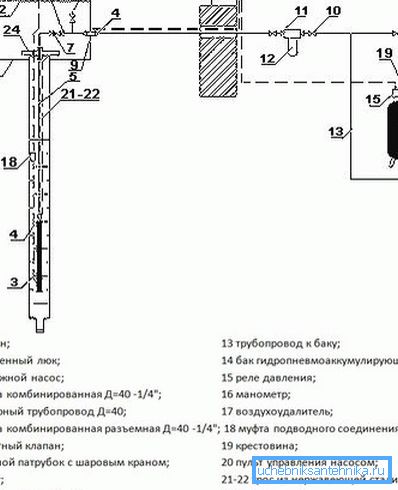
As a rule, the scheme of the water supply system in a private house from the well works with a working pressure in the range of 1.5–3.0 atm.
The work happens in this order:
- First, the pump pumps water into the accumulator. This battery inside is divided by a rubber partition into 2 chambers, one of them is filled with water, compressed air remains in the second;
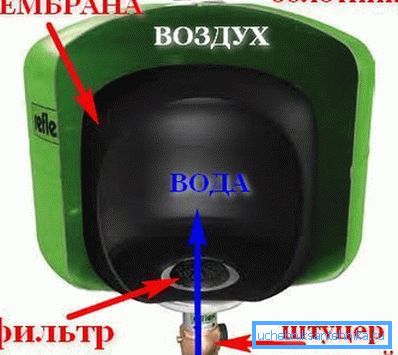
- after filling the battery, the pump shuts down; the required maximum pressure can be set to the pressure switch;
- as water is consumed, the pressure in the system decreases, as soon as the minimum threshold is reached, the pump is turned on again and the storage tank is filled.
If you organize a water supply system without a hydroaccumulator, then the pump will almost always turn on and off, this will not in the best way affect its durability.
Caisson device
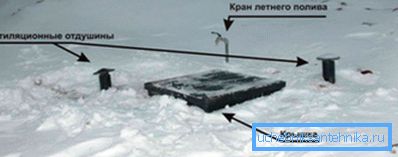
It performs several functions at once, in addition to being able to inspect the pipeline without problems, it also ensures cleanliness of the well. Thanks to the caisson, the groundwater is guaranteed not to fall from the surface downwards, this is especially important for wells on sand, the depth of which is relatively small.
The caisson is quite possible to make and most (brick or concrete walls), but you can simply buy a ready-made camera with all the necessary holes and even a convenient ladder for lowering it from the surface. The only thing that can be confusing is the price of ready decompression chambers, so the plastic ones cost about 20,000 rubles + the cost of transportation and installation, the home-made analog will cost much less.
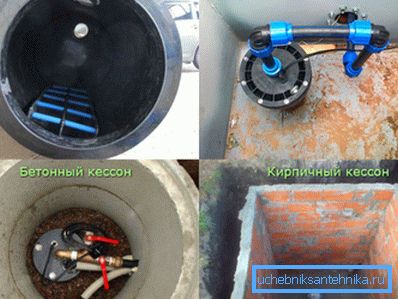
Note! The camera does not need to be completely buried in the ground, about 30 cm should remain above the surface. This refers to the hatch through which a person gets inside.
On how well installed the caisson, depends on the ease of maintenance of the well and its durability.
It is advisable to adhere to the following sequence of actions:
- a concrete cushion is placed at the bottom of the pit (you can simply lay the finished concrete slab with a hole);
- the pit itself rummages in several large sizes, the caisson chamber;
- after installing the chamber, the space between its walls and the walls of the pit is filled with a mixture of sand and cement in a ratio of about 5: 1. Above the pit is filled with soil;
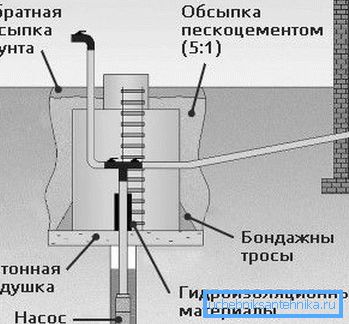
Note! If a plastic or metal chamber is installed, it is additionally attached to the concrete pad with bondage cables.
- after that the equipment is installed.
For improvised caissons, the procedure is about the same, only the walls of the chamber are laid out of brick or formwork is being built and concrete is poured. Otherwise, there are no significant differences.
The bottom of the caisson must necessarily be below the depth of soil freezing. Otherwise, in the winter time, maintenance of the well will become impossible, and pipes can easily break through.
Pump installation
Plumbing in a private house from the well is impossible without a pump, for wells, submersible pumps are used, and the power is selected depending on the depth and the required water supply. Before directly immersing the pump into the well, you need to connect a power cable to it, a pipeline through which water will flow, and a cable that will carry the main load from the weight of the equipment.
Note! The tensile strength of the cable should be several times the weight of all equipment. This is a guarantee that it will not break when removing the pump.
Before diving you must perform:
- power connection to the pump;
- pipeline connection (some sections of the pipe in the well are connected by a flange joint, this is necessary since, in addition to water pressure, pipes can also experience vibrations from pump operation, hydraulic shocks, etc.);
- so that in the well the cables do not become entangled, they are fastened together with a simple tape. The pitch is approximately 1.0 - 1.5 meters;
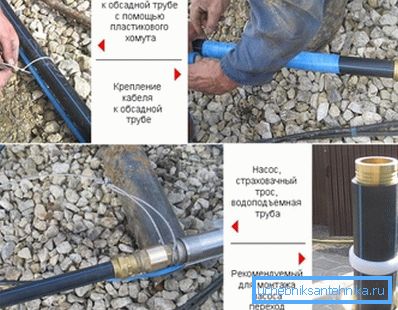
- The pump should be located at a distance of about 1 meter from the bottom (in order to not suck up the soil particles). Therefore, a test dive to the bottom level is performed, this position is marked on the cable and 1 meter is subtracted, so it is possible to position the pump fairly accurately;
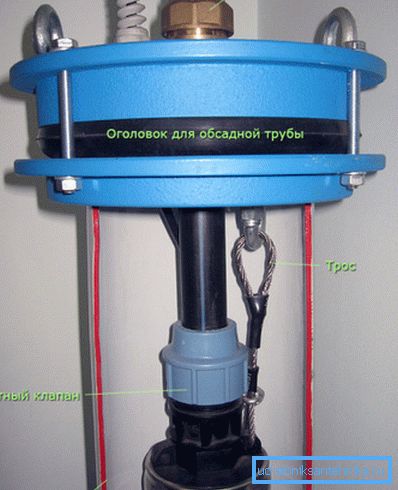
- the cable is fixed on the tip, which is then fixed on the casing.
Note! So that the pump does not hit the walls of the casing on its body, you can simply place a rubber ring that will play the role of a shock absorber.
The pump will start to operate normally after the pipeline has been filled in the casing. It’s usually enough just to wait another minute.
Pipeline laying
Plumbing from well to home is performed using ordinary plastic water pipes. The only thing you need to pay special attention - the depth of soil freezing, the water line must always pass below this mark.
An exception to the rules can be considered the case when it is planned to live in a house only in the warm season. You can simply lay the pipe at a much smaller depth (about 0.5 m). And before wintering, you will need to flush the system and blow the pipes to guarantee that, subject to these rules, pipes and fittings will survive negative temperatures perfectly.
Straight from the caisson chamber, the pipe is discharged into the trench and reaches the house, while the outer part must necessarily have a slope towards the drain. If necessary, this will allow you to simply preserve the water supply system from draining water from it. If the size of the caisson allows, then the drain valve can be placed directly in it.
Also, attention should be paid to the houses on stilts, in this case the weak point is the area where the water supply goes directly to the house. This site must be well insulated. You can use a special electrical cable for insulation or use mineral wool, etc. After that, you can do work inside the house.
Installation of equipment in the house
The task of how to conduct water supply to a house from a well can be considered solved only after the installation of the necessary equipment and pipe installation is completed in the house itself.
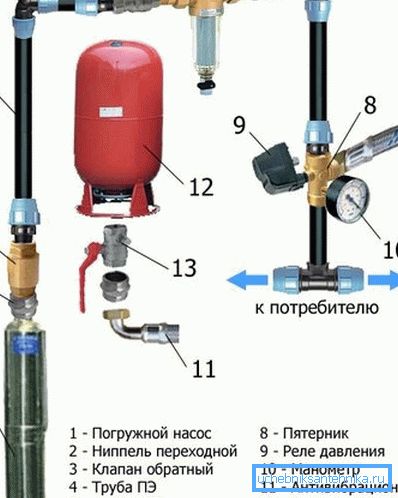
To make the water supply system more understandable, we will list all the elements of the system, starting from a submersible pump:
- submersible pump through a nipple and non-return valve is connected to the PP pipe;
- further follows the filter (already in the house), for ease of replacing it on both sides cut off ball valves;
- further in the diagram follows pyatnik, pressure switch and pressure gauge. Adjustable working pressure range;
- the hydroaccumulator for a water stock is connected;
- a collector can be installed to distribute water to consumers. In this case, the consumption of pipes will increase somewhat, but it will be possible to flexibly regulate the flow of water.
The accumulator can be considered the most massive among the listed equipment, the automation does not take up much space and can be placed almost anywhere:
- 100 l membrane accumulator takes only 0.8 m2 square and it can be placed in the basement, and disguise well in the kitchen;
- A 200-liter tank will take up more space and it is already better to prepare a suitable niche under it, for example, under the stairs;
- under the 500 liter tank is better to take a separate room.
Note! If you need to provide water to a two- or three-storey house, then a pressure boosting device may be needed, it is also installed in the house.
Alternative to caisson
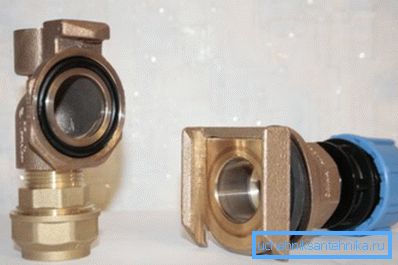
The design of a water supply system from a well described above is considered to be classic. The most time-consuming stage (in addition to drilling the well itself) can be considered the device of a caisson chamber and trenching. And if you can not do without trenches, then instead of a caisson, you can use a special adapter, thanks to which the pump can be removed while being directly on the ground.
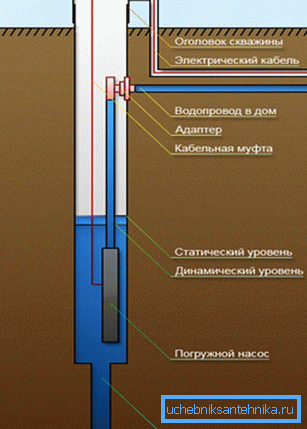
Such an adapter consists of 2 separate parts. One of them is fixed and mounted on the casing, and the second is inserted into the fixed part and wound on a metal pipe ending above the ground.
Instructions for installing such a cunning device looks like this:
- first, a hole is made in the casing at the desired depth (below the freezing depth);
- the main part of the adapter is installed on the hole; a pipe leading to the house is connected to it;
- the well is covered with a lid;
- the pipe connected to the pump is connected to the counterpart of the adapter;
- after that, it remains only to lower the pump into the well to the desired depth.
Summarizing
It is impossible to call a completely autonomous water supply system from a well, but still it surpasses the centralized water supply in all respects. And let the cost of such pleasure can not be called democratic, the costs are worth the result. Especially since you can save money and do most of the work yourself, the services of specialists will be required only at the stage of preparing documentation and drilling a well.
The video in this article describes an example of a house water supply system from a well.