Making a house for the well: the process of arrangement
For decorating the estate, they have always invented many decorative handicrafts made of wood and one of them is a house for a well with bears that support the gate like the famous Titans from ancient Greek mythology. But whatever this cap, intricate or the simplest, it always performs its main function - protects the water source from debris and in most cases contains a mechanism for water intake (gate).
Below we will discuss in more detail how to make such an arrangement, and also see the thematic video in this article as additional material.

Wellhead
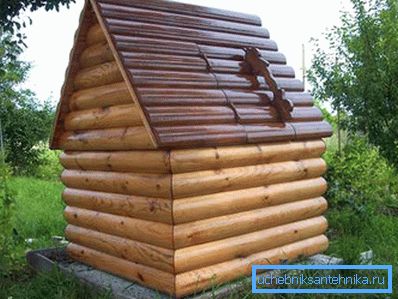
Note. Due to its functionality, the main element of the cap is a roof, which can be based on four or six pillars or walls, as in the photo above. Therefore, the projects of houses for wells may differ greatly from each other not only in appearance, but also in materials for execution.
Although wood is most often used for decorating, but it can also be metal or plastic, or it can be a combination of several materials, such as metal and wood.
Necessary tools and materials

- Let's make a reservation right away that the project of a house for a well, which we will consider, will be of wood, in any case, most of its main parts. Proceeding from this, we will need cutting tools, but in the 21st century the use of a hacksaw somehow receded into the background, so we can take a manual or stationary electric circular saw (circular saw) or use a small size chainsaw such as Stihl.
- Of course, you will need a construction level, a hammer, an ax, a chisel and a metric tape measure. Either nails or screws can be used as a fastener, although the latter is more reliable and based on this, a screwdriver or electric drill with a nozzle is required for tightening them (usually No. 2, although for large screws from 100 mm in length (especially stainless) it can be useful and # 3).
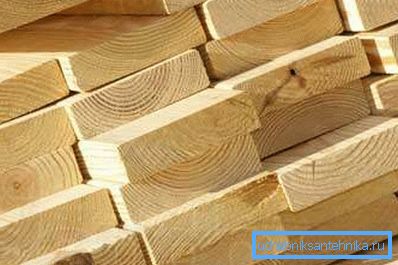
- For the installation of the frame you will need to use a cut board of different thickness - 30 mm and 40 mm, as well as a bar 100100 mm and / or 8050 mm. In addition, thin lumber can be used for the door, such as a 25 mm thick edged board and 2540 mm or 2550 mm rail. The roofing material, metal tile, slate and roofing material (enclosed under the main coating) is perfect as a roofing material.
- If you make a house in the form of a rustic log house, then you can use a solid or glued profile in the form of a rounded log or a bar. In cases where you prefer a lower price for the arrangement, you can use solid sawn timber, but all of them need to be sanded before installation, treated with antiseptics and opened with varnish. For glued material such a measure of processing is not required.
Bottom part
Note. In cases where the houses for wells consist of a tip (duo-pitch or hip roof) and walls (log), the log house itself should be laid on the foundation. Usually, paving slabs or just a concrete screed in the area where the well is located serve as the basis for strapping.
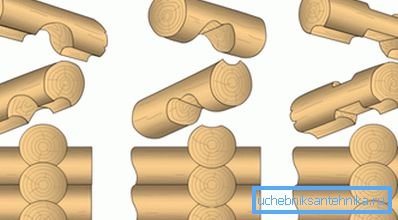
For ligation of logs and timber it is advisable to use three methods, which are indicated on the upper image:
- a) ohlop in half-wood,
- b) cooled by a crest,
- and c) to okhryap.
Of course, if you order a glued profile (timber or rounded log) and at the same time give the dimensions of the house for the well, then you can make ready-made grooves. That is, in such cases, it remains only to assemble a log house, as a designer - all the details will be marked and numbered.
The glued profile, as we mentioned above, is practically not afraid of moisture (due to factory processing and structure), therefore it will not lead from precipitation and hot sunlight. But a solid tree does not possess such properties and can twist, after which the walls of the log house will be uneven. To prevent this from happening, in the middle of each wall, dowels are hammered into the log or beam, catching two or three profiles with one piece.
Regardless of whether you will make the lower part of a bar or a log, you must trim the bar with a section of 100100 mm and fix it to the base with anchor dowels. It is very important that the harness is set strictly to the level, and each corner has 90 ?. But again, the whole device can be either square or hex, so let's pay attention to the rules of marking the corners.
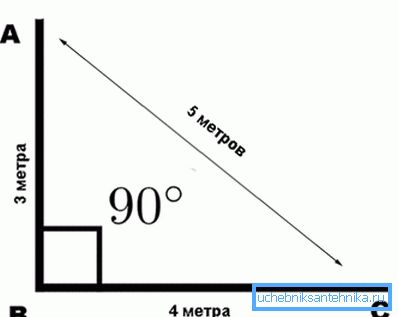
In our case, in order to calculate the right angle without special tools, we can take decimeters, not meters, for a unit of measurement. Then, if you measure from the point B to the point A 3 of a decimeter, and from the point B to the point C 4 of a decimeter and at the same time set the distance AC to exactly 5 decimeters, then the angle FBC will have exactly 90 ?.
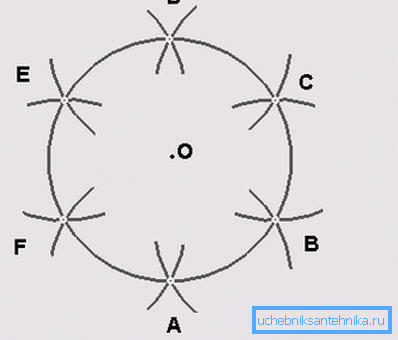
If the scheme of the house for the well is hexagonal, then you just need to mark the concrete circle itself in equal parts. To do this, simply calculate its radius, then the distance from one angle to another (AB, BC, CD, DE, EF and FA) will be equal to the length of the radius.
You can also use other options, that is, the circle is divided into five or, for example, into eight parts - all methods of such a breakdown can be easily found on the Internet.
Cap
Note. The cap can be installed both on a concrete circle, which is located above the ground, and on a log cabin, assembled in advance. If this is the last option, then the top trim will act as a power plate. But you can also raise the log house above the circle, then the slope of the roof will decrease and there will be more free space in the house.
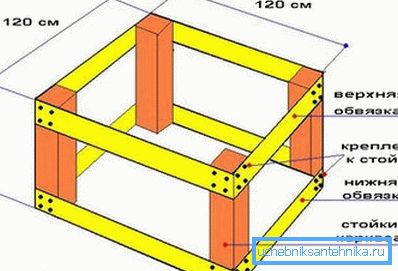
In those cases when the tip is installed on a concrete circle, it will be much better (more beautiful and more practical) if you lift the roof trusses not from the level of concrete, but raise it slightly higher, for which you will need a wooden frame. It is very easy to assemble such a base with your own hands and for this you will need four racks for which a timber with a section of 10080 mm and an edged board 40 mm thick and 100-120 mm wide will best suit (learn also how to build a house for a well with your own hands).
For ease of assembly, first assemble one wall of the frame, using for this purpose self-tapping screws 75-100 mm long, it is desirable that they be stainless. Then you collect another wall in the same way, and why are you connecting them together? Such work is best done on the ground, so that there is an opportunity to expand the frame with an emphasis on all fixing points at the same time.
In addition to the treatment with antiseptics, which is carried out during the preparation of parts, the design can also be covered with paint and varnish compounds, but before painting the house for the well, it must be finally assembled.
So, the difference lies in the fact that the initial processing (sanding and antiseptic impregnation of wooden parts) are done during their preparation (size adjustment), and the varnish and paint already acts as a finish and is applied after the installation of the entire structure.
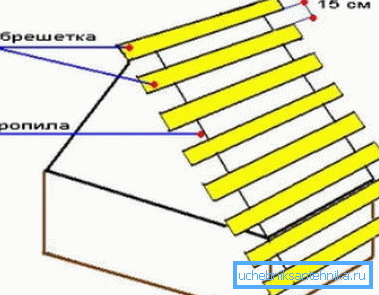
We now turn to the roof and first assemble the truss system - two trusses will be enough for this, which means we will need four truss legs. As the mauerlat, the upper trim of the frame or frame will serve, and instead of the ridge beam, two boards 30 mm thick and 100-120 mm wide, which are fixed on both sides at the junction of the truss legs, will work perfectly.
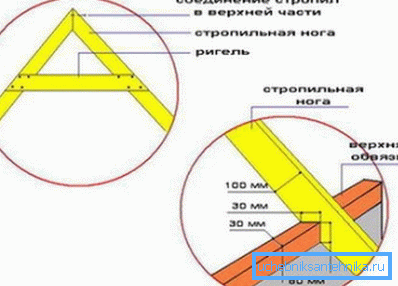
The length of the truss foot will depend on the height of the roof - the longer the bar, the higher the roof will be. Rather, the connection of the parts is done by trimming each of the legs at a certain angle and for this you can use masonry mash, but you can also make such marking manually, superimposing one profile on another and noting the extreme cut points
In order to connect the farm with the mauerlat, you need to make an appropriate cut on the leg, as shown in the upper figure, but you should not cut the body of the timber by more than 30%.
Now you need a crate for the roofing material and the distance between the boards that are sewn onto the rafters will depend on the type of roofing material. For battens, use the same boards that made the fad, that is, here is meant the same thickness of lumber.
Before screwing metal roofing, decking or nailing slate to the crate, spread the roofing material under it, so you will achieve the maximum isolation of the water source, which is possible in this case.
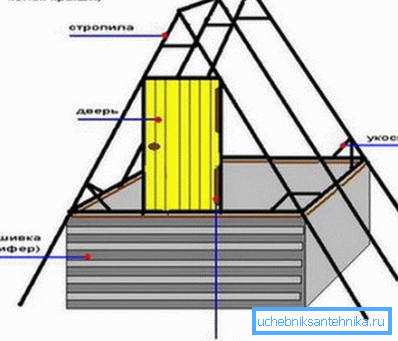
Before you make the door, you need to assemble the door frame, which, incidentally, can also be part of the frame and give it rigidity.
Of course, it is best to use a bar with a cross section of not less than 8050 mm, but if you think that the rigidity of the whole structure will be enough, then you can use a rail 5050 mm, but any instruction is not appropriate here - you decide for yourself. Just do not forget that the box must be rigid, which means that it will be part of the frame.
For the door there will be enough tongue or edged board, 20-25 mm thick, because on top it will still close with roofing material, but even if this does not happen, the antiseptic and paintwork finish will be quite enough.
Tightly fitted boards are fastened together by two transverse slats 25 mm thick at the top and bottom, and in order to give such shields rigidity, we use the principle of a triangle and diagonally, between the two jumpers, fasten another rail. For fixing the doors, it is best to use not ordinary canopies, but a piano loop, almost along the entire length of the board.
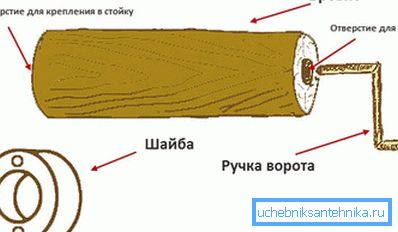
Now we need to make a gate for the well, and for this we will need a part of the log without knots, which can then fall out and form pits in the form of strong corrosion. The most difficult task in this case is to drill the log in the center, making it a cylinder, so if you do not have special tools, it is better to do it in the nearest carpentry workshop.
But you don’t have to do the cylinder at all - for this you only need to stick the axis of the handle as far as possible and hammer the pin on the opposite side. Most often, the axis of the gate sits on metal washers, which are clogged at the edges of the hole, but it will be much better if you use ball bearings of the desired diameter instead. The ends of the log should be bound with steel tape to avoid desiccation.
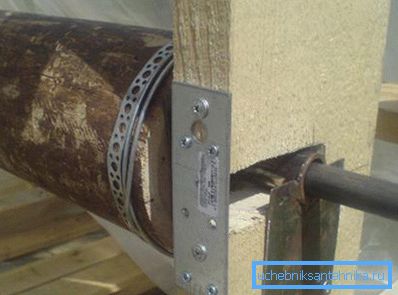
As you understand, wood is a fairly soft material and the load that a steel handle of a gate will exert under the mass of a raised bucket of water can be critical. But it is fixable, only for this you need to make props and clamps of metal, as shown in the top photo. To do this, a metal strip is suitable, on which you will need to make a small notch at the place of installation of the washer or bearing.
Conclusion
If you are interested in what to treat a house for a well, then almost any wood preservatives are suitable for this. For example, it may be Senezh, Pigna Wood Stein, Aquotex, Pinjason Color or Kompozit. You can buy them at any hardware store (find out here which pump is best for the well).
Good luck in construction!