To punch a well with your own hands is a very laborious
Without reliable water supply, of course, in the country nowhere. That's just the question arises how to provide it. Well, if the site already has a reliable working well. It is good if there is a common water supply nearby.
But, unfortunately, much more often the site is literally “in the open field” and you have to think about the well. Just say, the likelihood that there is an aquifer somewhere below you, there is a big one, only it is often very difficult to get to it, especially if you want to do it yourself.
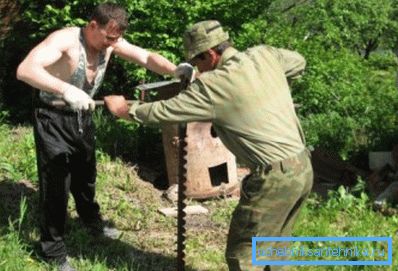
If you are willing to risk with insufficient guarantees of success
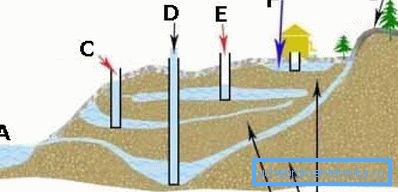
No, everything is possible, and start with the study of groundwater in your area.
Determine what type of groundwater is beneath you, and there are four in total (see Figure “A”):
- F - the upper, shallowest and most accessible reservoir, the so-called upper water - depth not more than 10 m;
- E - the level between the layers and without pressure - depth up to 30 m;
- C - also between the layers, but already the level having pressure, which allows to hope for savings on the pump - but the depth can reach 50 m;
- D - artesian wells, which simply flow and allow you not to use the pump, but the depths are very uncertain and can be very large - up to 250 meters, although the average variation is from 50 to 100 meters.
The diagram also shows:
- A - a river or any other permanent source of water on the surface, firstly, as a zone of unloading of layers, and, secondly, as a sign that there will be water in the well;
- B - waterproof layers;
- G - an important component of the entire system - ground feeding zone; no wonder, but, indeed, this zone may be located above the intended point of drilling.
Already from the diagram it can be seen that we are mostly accessible to seams without pressure, which means, having drilled a well independently, it will be necessary to think about a pump.
Drilling methods
To break a well, at your disposal are three ways:
- Screw - the easiest and cheapest. All work is done using a screw (the classic Archimedes screw), which is also called a screw in a different way. But this method is only for depths of no more than 10 m, when the washing of the distance traveled is not performed. The disadvantage of this method is that it is not applicable on heavy soils - floating or rocky, it is only for dry and soft ground layers. Often drilling with a screw is accompanied by the need to protect against sewage and the waters of the uppermost layers.
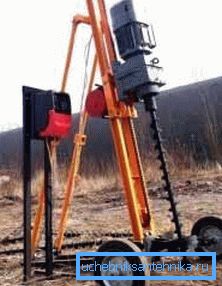
- Rotary - a very often used method, when a pipe is immersed in the ground, and a shaft with a sharp tip acts in it. All load provides hydraulic installation. This method is applicable to achieve any depth. Flushing up is used a solution that either:
- direct flushing with a pump is fed into the pipe and exits independently through the outside tube space, which is also often called “piercing a well with a pump, or,
- on the contrary, by backwashing, it is fed into the out-of-pipe space, and rises upward through the pipe by a pump; This method is considered more efficient, but it is much more expensive, and special equipment is indispensable.
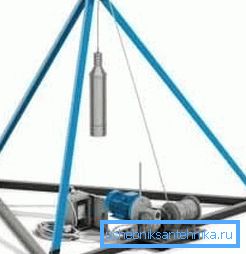
- Shock rope - old, reliable, but too slow and expensive. A heavy shell from above falls and crushes the rock - a very high-quality well is obtained. Broken breed rises up with the help of so-called zhelonka. Flushing is not required, this is another advantage of this method. With the help of this method, it is not possible to reach the subsequent water horizons without additional large expenses - it is necessary to install casing strings.
Installation example
Summarizing, we give a perfect example of a sample installation for the independent production of a well:
- A - electromagnetic start system with overload control;
- B - motor power from 2 to 5 kW;
- C - swivel with polyurethane cuffs, bearings and adapters;
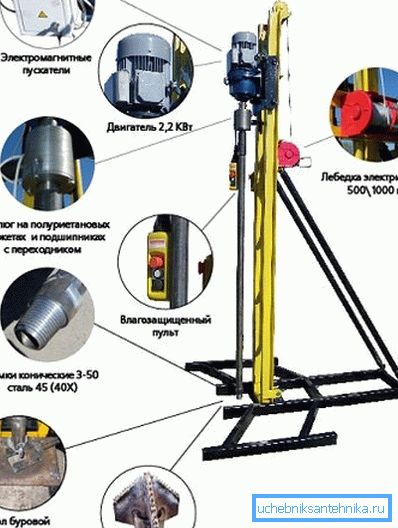
- D - electric winch, as an additional, but very useful equipment;
- E - the control panel protected from hit of moisture;
- F - steel locks;
- G - drilling rig table;
- H - powerful drill, performing its task on any soil.
As a drill and all kinds of tips you can use the following devices:
- "A" and "b" - drill spoons;
- "In" - coil;
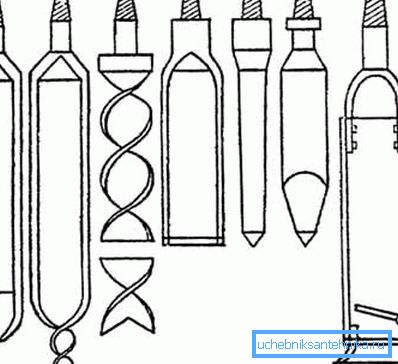
- "G" and "d" - chisel;
- "E" - the yellowcone.
Types of wells
Before starting work, it will be necessary to determine what kind of well will be created relative to the bottom of the aquifer.
There are two types:
- A - perfect - more reliable form;
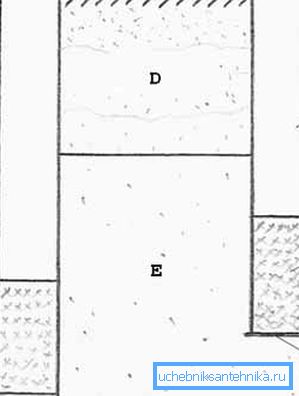
- B - imperfect - here the cost of work is noticeably lower, but it will be more difficult to install a cap from below.
Helpful advice! We advise you to use a wooden cap (better, from oak) - the tree will swell in the water and provide a perfect mount.
The figure also introduced the notation:
- C is the surface of the earth;
- D - the upper waterproof layer of clay and sand;
- E - the actual aquifer in sand or limestone;
- F - the bottom impermeable layer, often made of clay and sand;
- G - production column or casing;
- H - strainer;
- I - pipe plug from below.
Hello from Africa
Sometimes the perfect solution is to create the Abyssinian well, which is often done right in the basement of a building, and this is complete independence from the winter cold.
Such a well-well:
- is a simplified version of the extraction of water from the soil, it is also called simply “needle”;

- in this construction the pipe in inch dominates, at the bottom of which a cone (C) with a screen filter (B) and a check valve (A) is screwed;
- after manually digging the pit, a pipe with a cone is driven into the ground;
- The method is very suitable for work at depths.
Progress
The whole course of work is the preliminary creation of the working mechanism.
What we strive for
The goal will be to create the following mechanism for drilling a well:
- 1 - immersion type filter;
- 2 - telescopic pipe system;
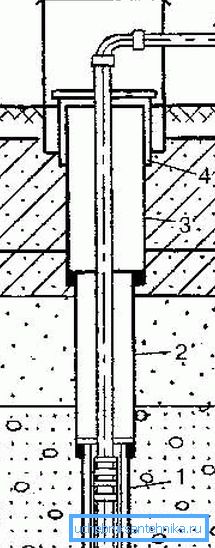
- 3 - the first, casing;
- 4 - at the top, the jig.
We work
So, the instruction is clear, the price suits, we proceed to the implementation:
- at the point of drilling, dig a hole 2 meters deep, along the ground - one and a half and a half;
- in the center we make another well in a meter deep;
- insert a drill coil on the tip of the steel bar (here you need to think in advance about the method of connection - either the pin or the thread) and continue the groove down by using it;
Helpful advice! We advise you to check the quality of all the connections more than once, to drown the tool in the well is not difficult at all, just getting it from there will be very difficult.
- if a more difficult breed is encountered, we change the coil for a chisel;
- when we reach the wet rock, we stop and expect further developments;
- if the water rises to the top, then we insert a casing into the well with a filter in the lower part;
- further, on the cable (preferably two - the main and safety) fasten the chute, install a tripod, fasten the slug on it and continue to pass with it;
- after reaching the lower waterproof layer, we will continue to go deeper by 5-10 cm and stop - the well is ready;
- it remains to remove the unnecessary soil, but we do it with a slug, stepping back a little from the bottom of the lower layer;
- when the ground is removed, insert the cap into the lower hole of the pipe - you can use a wooden one or a bag of cement with sand;
- after 2-3 days, when the plug finally closes the pipe, lower the submersible pump and proceed to pumping the well;
- when clean water goes, and this may be a week or more, the well is ready for service.
findings
What can I say, when you go through the whole algorithm of work for one neighbor, for another, try it for yourself, then the work will seem not at all difficult. But first, you cannot do without a reliable partner who can support at the right time and give sensible advice.
If such a partner was not found, let them become this article and additional video in this article. Do not forget, the guarantee of success will be your good study of the subject, the gradualness and deliberation of all the works.