Water well: how to equip it on your own site
In most holiday villages there is no centralized water supply. Using a public well or column is quite laborious, especially if the source is far away.
It is not practical to build an individual well, especially considering the current ecology and the use of special equipment. Acceptable output can be considered the construction of a water well on its own, especially since it is not as difficult as it may seem at first glance.

Types of wells

There are many types of water supply structures. They are separated by depth, characteristics of produced water, scale and construction technique..
For summer residents and private homeowners fit two types.
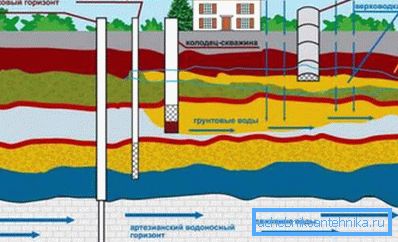
- Sandy counterparts, or "on the sand." They are rather shallow (up to 50 m), where water is extracted from a layer of sand that lies at an average depth.
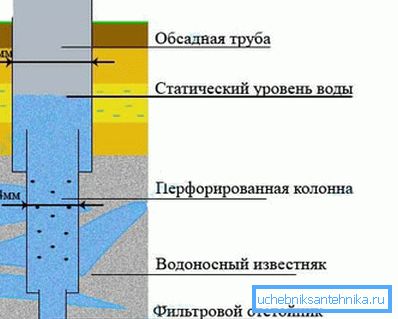
- Artesian wells, or "on limestone." This is a more serious design, in this case, the water comes from a depth of 200 m.
Note! Solely with your own hands, without help, you can hardly cope with the artesian type of objects. Therefore, for a small cottage or a country plot the sandy option is best suited.
Preparatory activities
Before you decide on the type of well and its location, be sure to examine the distance to the water level.
Determine the location of the occurrence of water

At the first glance at the well in the section, it becomes clear that the layers of sand and clay tend to alternate.
Water, as a rule, is not in the upper sand layer, but later - after loam.
- Initially ask the neighbors who already have their own wells. Look or ask for permission to measure at what level the water begins at them. Most likely, in your case you will have to dig to the same depth. If it does not exceed 20–25 meters, you can be sure that you master the installation.
- It would not hurt to hire a geodesic specialist if finances permit. Since the drilling of water wells falls within their competence, valuable advice and professional calculations will benefit you. Armed with the necessary instruments, they will quickly and as clearly as possible point out the best place for a future well.
The type of water you need
In the case of planned extraction of water exclusively for technical purposes (eg, irrigation), you can not particularly worry about its cleanliness. But in most cases the owner is set to pump clean, drinking water.
Then you should consider the basic parameters for the determination of purity.
- The top layer of settled water should not be less than 30 cm.
- For each liter of liquid, no more than ten Escherichia coli are permissible.
- Acceptable levels of nitrates - no more than 10 mg / l.
- Evaluation of taste and smell - 3 points.
Note! It is clear that you yourself can not do the analysis, so the instruction recommends that you contact the nearest sanitary-epidemiological service. Do not risk your health, and do not use untested water in the laboratory for drinking.
Sandy water
If you need half a cubic meter of fluid per hour (for irrigation and household needs of an average family), drill a well "on the sand."
Features of drilling

It will take about two days to work. Moreover, if the aquifer is shallow, the result will get even faster. You can do without special equipment.
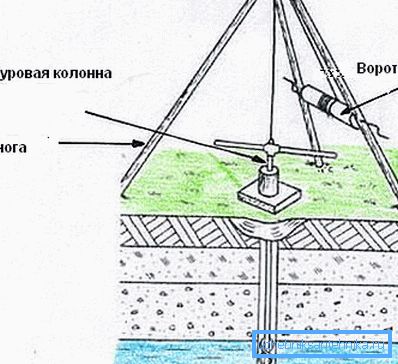
Simple water wells at the dacha rummage through an uncomplicated manual tool - a drilling tripod with a suspended column.
- The cheapest option is to make a well's tripod tower from three identical bars, logs or pipes. In the upper part they are fastened with a pin.
- At the top, at the junction of the legs, install the lifting unit.
- The lower parts of the two legs are connected by a winch or winch.
- The drill string is assembled from several rods 1.5–3 m long by connecting them with couplings.
- Since the column will sink into the ground, it is best to make it from metal water pipes with steel couplings.
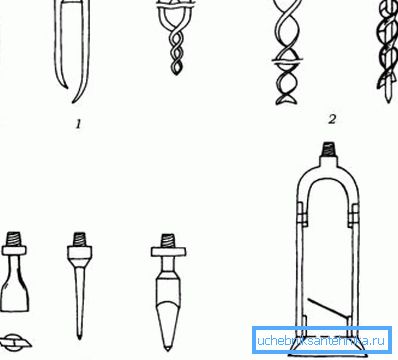
- The drill head (drill drill), which is screwed onto the column with the aid of a threaded adapter, will serve as a shock part, cutting into the ground.

- Head, falling into the soil, will fill the cavity of the drill. To work effectively, you need different types of nozzles, the most suitable for the properties of the soil. A “spoon” is used for soft soil, a “serpentine” for medium hardness, and a “chisel” for hard rock.
- To prevent shedding of the earth in the well casing is installed. Good fit communication elements made of plastic.
- The bottom of the casing resembles a shoe, with a smooth or serrated edge at the bottom.
In the presence of the simplest homemade mechanism, the installation of a water well in your area will take very little time and effort. You can even do without helpers, especially if the water lies at a short distance from the surface.
Construction and launch wells

- So that the soil does not crumble, make a pit-hole with sides of 1.5 meters by 1.5 and a depth of 2 meters.
- Lay the floor and walls of the pit boards. They are also equipped with flooring on top.
- Next, put the drilling tripod and remove the upper flooring.
- In the center of the bottom flooring, drill a hole in the size of the shoe and clutches.
- Make the same hole in the upper flooring.
- Stepping back from the upper flooring 70 cm, put a label on the column.
- Lower the column to the indicated label, then pull out and free the drill from the captured earth.
- Repeat the process until it is necessary to increase the barbell.
- The bar can be extended with the same tube by screwing it with a coupling.
- When loose soil after the deepening of 2-3 m is to insert the casing with a shoe.
- As you progress inward, alternate the drilling of the well with the installation of the next piece of casing.
Note! If you do a well in the country with your own hands, if possible, place it closer to the house. After carrying out the drilling work, clean the finished well with a shell, then mount the filter on the bottom. After dismantling the decking, you can install the pump and decorate the aboveground part.
Conclusion
If you have one or two free days, you can spend your time with benefit. Provide your farm with water, then an autonomous source for many years will greatly facilitate your life. For more information, see the video in this article, from it you can learn a lot of interesting and useful.