We make an independent connection of the dishwasher to the
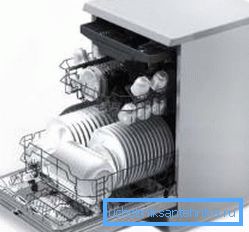
Using appliances in the kitchen not only frees up time, but also reduces costs, including water. This is a dishwasher, which is gradually gaining the favor of our consumers. Today we will talk about its connection to the central water supply and sewer network. In this case, those who have some skills working with plumbing and electricity may well do their own.
Process steps
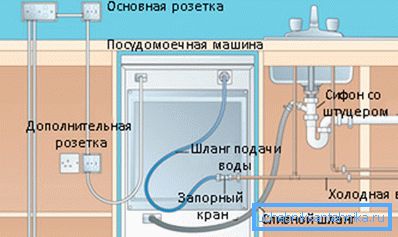
Below will be offered an instruction in which step by step it is told how and in what ways to connect this kitchen equipment to the utilities of an apartment.
It consists of four major sections:
- Power supply and installation of power sockets.
- Preparing a place to install a dishwasher.
- Connecting the unit to the water supply network.
- Connecting the device to the sewer.
After carrying out the above work, it is necessary to make a test check of the dishwasher. If necessary, eliminate the shortcomings that occurred during its installation.
Tip: if you have a problem with the water supply, in the retail chains a dishwasher is offered to give without plumbing, where the whole process takes place with the help of manual rotation of the handle on the side of the cabinet.
We supply power and install an electrical outlet
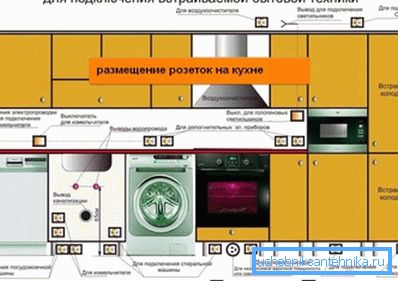
- These works must be completed in advance, since the installation of the dishwasher is attributed to the finishing stage, which is carried out at the last stage of repair work.. We recommend in advance to provide a power outlet for this unit, i.e. when you start installing it, it should already be in the right place.
Tip: before the dishwasher, hold a separate power line with a circuit breaker for 10-16. His choice depends on the power of your kitchen unit.
- For the line, use a copper three-core electric cable with a cross section of 2.5 mm.
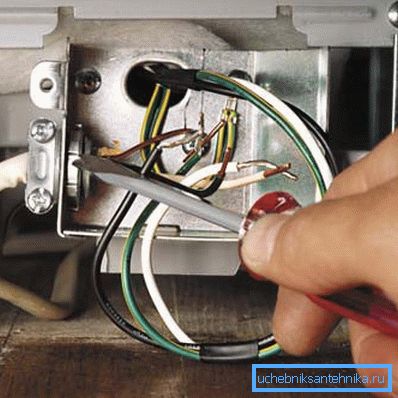
- Prepare for it a separate wire for grounding wiring, and also ground the socket for the dishwasher.
Materials and tools for installation
It is necessary to worry in advance about:
- keys - adjustable for plumbing and pipe work;
- a set of screwdrivers with shaped and flat heads;
- plumbing pipe cutter, its price is small;
- a pipe countersink to remove burrs from the inside of the cut off pipeline;
- short construction level (up to 400 mm);
- electric drills;
- a set of feather drills for wood sizes of 15 mm, 22 mm and 50 mm;
- copper sanitary pipe for supplying water to the device;
- fittings for copper pipe - collet nuts specially designed for them.
Tip: when water supply flexible hose, which is included in the dishwasher, when its length is sufficient, you can not use pipes and connections to them.
It is possible to supply water to the unit with metal-plastic high-pressure pipes. Then pick fittings based on the type of pipe selected.
In addition, you will need:
- a water corner or a tee with the locking spherical crane. Thanks to the latter, you can turn off the appliance at any time from the housing water system;
- sanitary tape fum or flax with paste Unipack;
- screws with plastic dowels.
Tip: at the dacha can be used dishwasher without running water. Install a storage tank next to it and connect it to it. During work, she herself takes the required amount of water.
Preparing a kitchen cupboard for dishwasher
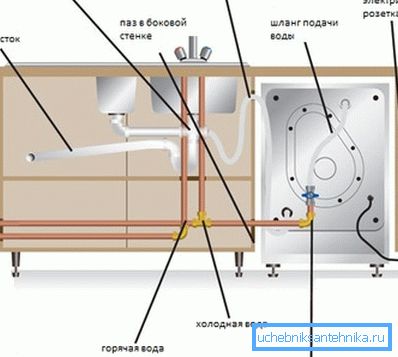
During the installation of the built-in kitchen appliances, drill holes in the lower or side walls of the cabinet through which the water and sewer pipes will pass. Also make, if needed, a pass for the electrical cable.
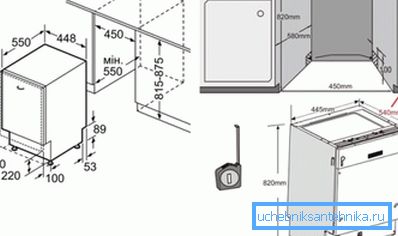
Drain and water inlet are located on the back of the device from different sides. They have different diameters, so do not confuse them while drilling aisles.
Connect the inlet hose
There are two options for this work, and in any case you should not forget:
- do not extend the power supply hose using threaded connections;
- It is necessary to use a new water pipe or a new inlet hose.
| Aqua-stop system |
|
| Without Aqua-stop system |
|
Tip: when you have to use copper pipes for plumbing, bend them carefully. For example, it can be used for smooth bending of the surface of cylindrical objects. Use special springs to create sharp right angles. They must be inserted into the pipe so that the products do not break. In this case, the angles of rotation are obtained even a small radius. After bending, do not forget to remove the springs.
- remove burrs after undercutting pipes with a round file or countersink;
- better not to use a hacksaw, give preference to special scissors;
- Be careful not to overtighten the collet connections, otherwise the sealing ring may be damaged;
- when choosing pipes, note that they must withstand pressures from 1 to 10 bar and temperatures up to 65 ° C.
When preparing the site for the unit, consider:
- if necessary, move the water pipe closer to the place of installation of the device;
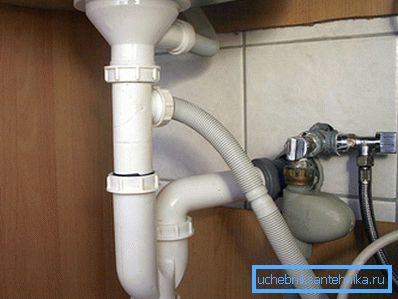
- Install an L-shaped or T-shaped tap on the water pipe used to connect the dishwasher's inlet hose.
Drain connection
To drain the sewer pipe it can be done in two ways:
- When the device is located in close proximity to the kitchen sink, its drain can be connected directly to the last siphon. To do this, put a siphon with additional drain taps, maybe one or two, designed to drain.
- When organizing a drain directly into the waste sewer, remember that it should be placed at a height of at least 400 mm from the level of the dishwasher. Only in this case the machine will not “drain” the dirty water from the sewage system during operation.
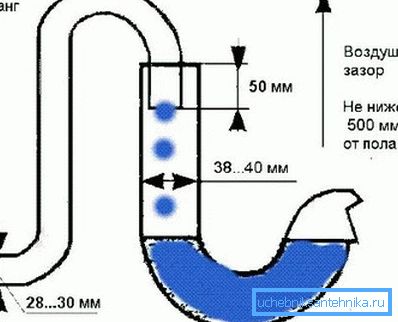
Tip: when the general sewage system has a level below 400 mm, you need to bend the outlet hose at the entrance to it to get the opposite letter “U”.
We recommend to install check valves on both drains, if at the same time connecting to the sewer drain pipe from the dishwasher and washing machine. So you will not allow dirty water to flow back into the car.
Install the dishwasher in place
- Connect the device with your hands to the drainage system and water supply network.
- Use a special gasket to secure the outlet hose in the branch pipe when connecting to the siphon using ring couplings with a clamping screw.
- Install the outlet hose at a height of 400 mm from the level of the device.
- Replace the dishwasher. With the help of construction level align its position.
- Screw the dishwasher into the kitchen cabinet using a special fastener to fasten a screw.
- Connect your device to an electrical outlet.
- Check once again the evenness and reliability of the installation of the unit.
- Install the dish basket into the device.
- Make a test start of the unit.
- Check during testing of joints for undermining and leakage.
- If there are no comments, then you can continue to use the device, not forgetting about preventive measures.
Conclusion
Installation of a dishwasher is not particularly difficult. You will need skills with electrical equipment and plumbing. Try to do all the work strictly according to the instructions. The video in this article will provide an opportunity to find additional information on the above topic.