What is the tip for the well and how to install it
Proper well equipment requires the use of a tip. Regardless of the modification, whether it is the tip for the well 133 or another model, this is the most important node in the well design.
The use of this node makes the operation of the entire system more simple and efficient, and in addition, prevents foreign objects from entering the water supply well.

The need to install the tip
For reasons of economy, some compatriots prefer not to set a cap for wells, but this approach to well operation is not correct. The fact is that it is not enough to wrap polyethylene and scotch tape around the wellhead, and then cover the entire structure with an old bucket or pan.
No scotch and no film are able to protect the well when the groundwater rises. Thus, the lack of a cap will cause damage to the system and water pollution.
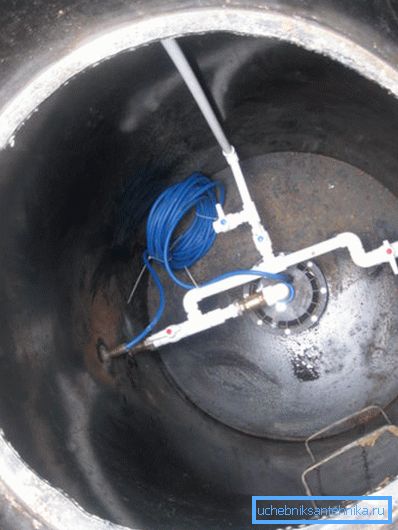
Holes for wells keep the cable on which the submersible pump is fixed. In addition, through the tip there was a cable supplying electricity to the pump and a pipe for pumping out water.
This entire unit is firmly attached to the casing and allows you to immediately perform several important tasks, including:
- providing tight reliable isolation of the wellhead from floods and snowmelt;
- protection of the well from contamination and surface water from outside;
- prevention of theft of equipment and component materials involved in the operation of a well well, which is important for seasonal residence in a country house or in the country;
- the achievement of increased debit of shallow sand wells due to the voltage generated during the operation of the pump;
- prevention of internal freezing of the well during the cold season;
- improving the quality of produced water due to the absence of ingress of pollution from the outside;
- increase the operational life of the pump due to reliable suspension.
Types of wellheads

In accordance with the materials used in the production, there are two types of tips:
- Metal structures that are made using steel or cast iron. Such products are most popular because they work for a long time without breakdowns.
- Plastic modifications are universally purchased for the assembly of shallow wells. The main advantage of plastic products is the price more affordable, compared to the cost of metal counterparts.
In addition, the tips differ in size, as a result, you can purchase a unit designed for the required diameter, for example 125 mm or 160 mm.
Construction features

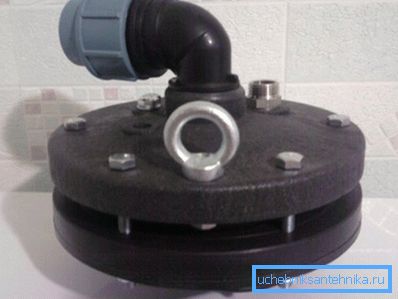
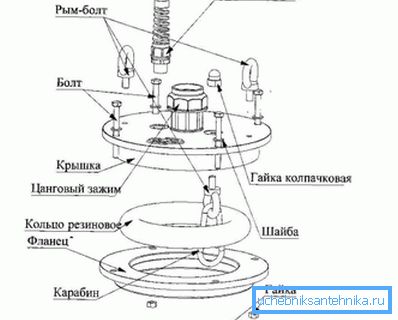
The standard head for the equipment of wells is completed with the following devices:
- metal or plastic flange;
- protective cover;
- rubber ring;
- carbine;
- fasteners.
One eyebolt is welded on the inside of the steel cover, and two bolts are welded on the outside. The main advantages of the installation of this design should be attributed to the fact that the installation does not provide for the need for welding.
In order to install the product at the wellhead, it is enough to tighten the fixing bolts. The mounting bolts compress the cover, the pressure flange and the sealing rubber layer into a single hermetic layer.
The use of this design provides the ease and convenience of mounting a submersible pump for the eye-bolts located on the cover. Lifting and lowering devices for the well can be carried out by means of lifting mechanisms such as a winch or a crane.
A carabiner is fastened to the inside of the cover, for which the cable can be fixed, at the other end of which the pump is located. Such a system greatly simplifies the use of a water supply system from a well.
Assembly work

- At the initial stage of the installation, we cut the casing perpendicular to its axis.
- Carefully align the edge of the cut and clean it from burrs.
- We clean the outer part of the casing with our own hands from dirt and dust, we ground it and coat it with anti-corrosion paint.
- After that, we attach a pump to a plastic pipe.
- There we also attach a cable of the required length and increase the cable.
- The assembled structure is clamped with a yoke.
- Fasten the free end of the cable to the carabiner by threading it through the eyebolt located at the bottom of the cover.
- Through the lid skip the plastic pressure pipe and power cable.
- The rubber ring and flange is installed with a flat surface on the outside of the casing.
- After the submersible pump is lowered into the well, we install a sealing cap. To install the cover, slightly raise the rubber ring and the flange to the height of the cap of the tip.
- Lid and flange bolted so that the rubber ring gasket compressed.
Important: In order to eliminate the possibility of slackening of the polyethylene standpipe, we use a clamp collet. Sagging cables are fixed by cable entries.
We make the tip yourself

So, how to make a tip with your own hands?
- The flange of the tip is made of galvanized sheet steel with a thickness of 10 mm. In accordance with the outer size of the casing, cut a flange with an inner diameter slightly larger than this size.
- Cut a plug according to the diameter of the flange, to which later it will be possible to weld the lead-ins for the pressure pipe and for the power cable.
- Outside the lid, weld two eyebolts, which are necessary for lifting the lid and for lowering the pump when performing certain preventive work.

- From the inside of the cover we weld one eyebolt, for which the pump is mounted on the cable.
- The cover attached to the flange, bolted.
Important: In order for the homemade tip to be sufficiently tight between the flange and the lid, we place a rubber ring gasket.
Conclusion
A well near a country house is an essential attribute of a full-fledged all-season living outside the city. But the price of some structural elements necessary for the construction of a water supply system is high.
To save your money, these devices can be made independently. In order to simplify the manufacture and installation of the tip, watch the video in this article.